Washoe County Master Gardener Newsletter (2025-03)
In this edition
- About This Newsletter
- A Note From the Editors
- To Plant a Garden is To Believe in Tomorrow"
- What's Happening This Spring
- A Garden With a Mission: The Year in Review
- Mule Deer Problems?
- Preparing To Plant Tomatoes
- The Enigmatic Onion
- Scouting for Early Spring Winter Annual Weeds
- Transplanting Seedlings Indoors and Out
- Understanding Fertilizers
- What’s Cooking in My Garden?
- Green Blood for Pets
- A Jewel in My Garden
- Master Gardener Photos
- Gratitude
About This Newsletter
Welcome to our newsletter dedicated to gardening enthusiasts in Nevada! Here, the Master Gardener Volunteers of Washoe County are committed to fostering a community of gardening knowledge and education. Through this publication, we aim to provide research-based horticulture insights for our readers. Each quarter, we offer a wealth of information covering various aspects of gardening, from upcoming garden events to advice on topics ranging from pest control to sustainable gardening practices. Join us as we explore the science and artistry of gardening together!
A Note From the Editors
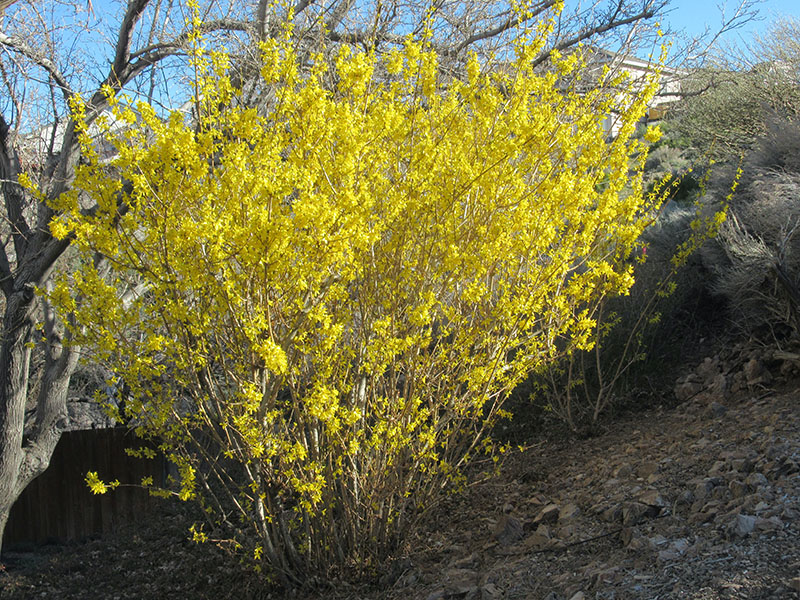
The early-blooming, bright yellow flowers of the forsythia
shrub are a cheerful hello to spring.
Photo by Becky Colwell
Here in the high desert, winter likes to tease gardeners into thinking that warmer days are just around the corner. But, being the trickster that it is, winter seems to want the last say by providing snowstorms into April some years. Even so, as gardeners we are carefully inspecting our yards looking for the first signs of green.
As the days gradually get longer and the birds are singing it’s tempting to stay outside all day doing winter clean-up chores.
But avoid the temptation! If you left a layer of leaves in your perennial garden for the overwintering beneficials, be sure to wait until daytime temperatures are consistently at 50 degrees F. before clearing. Better yet, leave some for mulch to help retain moisture during the hot summer months. This is also a good time to divide or transplant emerging perennials.
And it is the perfect time to get a handle on the weeds in your yard. Many can be hoed or hand-pulled when they first emerge, and they flower and go to seed amazingly fast. Don’t let them do that and add to your weed seed bank!
Spring-flowering shrubs such as Syringa spp. (lilac), Forsythia spp., and Viburnum spp. such as snowball bush should be pruned immediately after blooming. Early spring is also the perfect time to prune summer-flowering shrubs such as Potentilla spp., Hibiscus syriacus (Rose of Sharon), Buddleia spp. (butterfly bush), and Lavandula spp. (lavender). All established shrubs can benefit from “renewal pruning.” This involves removing 20 to 25 percent of older branches from the base to maintain the shrub’s health and keep its size down. For summer-flowering shrubs, this is best done in late March through early April.
Most chores involving the vegetable garden are still being done indoors, in greenhouses or under grow lights. But you may want to trim back perennial herbs like oregano and thyme to encourage fresh growth, clean up the asparagus and rhubarb patches, and pull back any leaf mulch from garlic beds. And, of course, prep the garden for hardy spring crops like spinach, lettuce, and peas.
Happy spring gardening,
Becky and Chris
“To plant a garden is to believe in tomorrow.” – Audrey Hepburn
Article by Rachel McClure
Washoe County Master Gardener Coordinator
I have faith in the future. I believe in humanity. I trust that the seeds we plant will grow and flourish in our gardens in times to come. For these reasons I tend my soil, so it is nutrient-rich. I educate myself in things I do not know, so I have a fuller horticultural knowledge and understanding to make the best choices possible. I pay attention to the needs of my growing plants, all in the belief that my efforts today will lead to a better garden tomorrow.
The Master Gardener Program provides university-researched, scientifically-based horticultural information. Master Gardeners use this information to learn and help their community members with consumer-based horticultural needs. We don’t talk about religion. We don’t talk about politics. We talk about PLANTS and everything related to them.
Come to one of our talks this year. In February and March, we have our annual Gardening in Nevada: The Bartley Ranch Series on Tuesday evenings. In April we have our Extension @ Lake Tahoe series on Wednesday evenings. During the growing season we have our Third Thursday Talks @ Rancho San Rafael in the evenings and year-round we have our Talks @ Spanish Springs Library the fourth Sunday of every month. There are lot’s of other events sprinkled in here also. See the Extension Washoe County Master Gardener website for event information or check out our Facebook social media page for the most updated information.
Hopefully I will see you at one of our talks sometime soon. They are an investment in ourselves and our community. We will keep planting seeds and talking plants, looking forward to tomorrow and the gardens we will grow together.
Master Gardeners will be giving short presentations on a wide range of gardening topics at various locations this spring, and a mobile Master Gardener help desk will be available at some locations as well. See locations, dates and times below.
What's Happening This Spring
Master Gardeners will be giving short presentations on a wide range of gardening topics at various locations this spring, and a mobile Master Gardener help desk will be available at some locations as well. See locations, dates and times below.
Garden Talks at the Library
Where: Spanish Springs Library, 7100A Pyramid Way, Sparks
Talks will be held monthly on the fourth Sunday from 1:30 to 3 p.m., and the mobile help desk will be available from 1 to 4 p.m..
March 23, 2025
1:30 p.m - Pruning and Planting Roses: Early spring is the time to plant bare-root roses and prune your existing roses. Confused about the different types of roses? Come and learn all about roses from Master Gardener Georgette Porter.
2:00 p.m - Planning a Cutting Garden: Grow your own fresh flower bouquets! This talk provides a brief guideline to planning, growing, maintaining, and harvesting plants to have a continuous supply of fresh cut flowers and foliage all season long. Join Master Gardener Deborah Henderson to learn tips on starting a cutting garden of your very own.
2:30 p.m. – Early Spring Weeds Identification and Control Methods: Troubled by weeds in your yard? Come and learn identification and control methods for the early spring weeds cropping up in your yard right now from Master Gardener Melody Hefner.
April 27, 2025
1:30 p.m. - What Colors Attract Specific Pollinators: Come learn about pollinators, the biology of their sight, the adaptations of plants to attract pollinators and the colors that attract specific pollinators. Master Gardeners Deb Barone and Kathi Linehan will provide valuable information on this interesting topic.
2:00 p.m. – A Day in the Life of a Honeybee Colony: Welcome to the wonderful world of honeybees! Local backyard beekeeper and Master Gardener Amanda Campbell will provide an overview of how a honeybee colony is structured, the different types of bees within the colony and the roles they play, the lifecycle of a honeybee, and how honey is made.
2:30 p.m. – The Importance of Planting Native Milkweed to Support Monarch Butterflies: Monarch butterflies are probably one of the most famous butterflies in North America. These butterflies migrate and lay eggs on native milkweed plants, where the larvae or caterpillars feed. Providing native milkweeds in your garden can aid these butterflies. Come join Master Gardener Tricia Howarth to learn about native milkweed care and sources for these plants.
May 25, 2025 - Herbs
1:30 p.m. - Gardening with Herbs: Many herbs can be grown in our area in containers and garden beds and as landscape plants. Come learn about the herbs that grow best in our climate, and some tips to keep them happy and productive. Join Leslie Edgington, Master Gardener, to learn about these herbs.
2:00 p.m. – A Kitchen Herb Garden in Containers Inside or Outside Your Door: Fresh herbs are great for year ‘round cooking. Come learn about the most popular culinary herbs you can grow in containers and when to move the containers inside from Master Gardener Keri Wilkins.
2:30 p.m. – Harvesting and Preserving Herbs: Fresh herbs are wonderful in the summer, but are you wondering how to harvest and preserve herbs for winter use? Join Master Gardener Intern Barbara Ramsey to learn how to preserve and store herbs.
June 22, 2025
1:30 p.m. Harvesting and Curing Garlic: Did you plant garlic last fall and now you are wondering when you should harvest it? Master Gardener Gary Garrett will teach you all about the right time to harvest your garlic and how to cure and store your garlic.
2:00 p.m. Plants for Clay Soils: Much of the Truckee Meadows has clay-rich soils, which can be a real gardening challenge! Join Master Gardener Melinda Gustin to learn about plants that will grow well in clay soils.
2:30 p.m. Pruning Spring-Blooming Shrubs: Spring-blooming shrubs, such as lilacs, forsythias, and flowering almonds should be pruned after they bloom in the late spring. Join Master Gardeners Shari Elena Quinn and Linda Fulton to learn proper pruning techniques for these beautiful shrubs.
Third Thursday Evening Garden Talks
Where: Rancho San Rafael Regional Park, 1595 N. Sierra St., Reno
Join Washoe County Cooperative Extension Master Gardeners on the third Thursdays in May, June, July, August, and September for evening garden talks. Talks will be held in the park’s community garden, beginning at 6 p.m., and ending by 7:30 p.m. The talks are hands-on, casual, informative, and free. Also during this time, from June through September, a mobile help desk will be available to answer garden-related questions.
Saturday, April 26, 2025
10:00 a.m. to 1:00 p.m. Farm Days and mobile help desk. Stations will be set up around the community garden discussing different gardening topics.
May 15, 2025
6:00 p.m. A Nevada Story: The History of Rancho San Rafael Community Garden by Martha McRae
6:30 p.m. Topic to be determined
June 19, 2025
6:00 p.m. Topic to be determined
6:30 p.m. Topic to be determined
7:00 p.m. Topic to be determined
Also on display during the garden talks will be the Nevada Weed Education Station with examples of weeds present in the garden during the month of June.
Master Gardener Annual Plant Sale:
Where: Extension office, 4955 Energy Way, Reno
Friday, May 16, 2025: 2 - 6 p.m.
Saturday, May 17, 2025: 9 a.m. - 1 p.m.
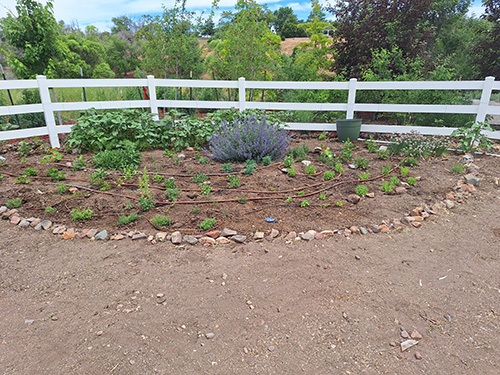
A Garden With a Mission: The Year in Review
Article and photos by Martha McRae
The Community Garden at the Rancho San Rafael Regional Park is being developed by Master Gardeners and park rangers as a demonstration and teaching garden. It was in its third year in 2024, which actually started in late 2023 when Master Gardeners Melody Hefner, Chris Doolittle, Martha McRae, and others put together a plan and budget for the coming gardening season. The row garden, where we would grow vegetables for donation, was to double in size to 12 rows, and several new growing areas would be added to demonstrate different gardening techniques. In addition to some funding we received from the Master Gardener extension budget, Master Gardeners and interns working at the garden contributed more than $3,000 in plants and supplies to help ensure a successful growing season.
MG volunteers got started in the garden on Feb. 10 by pruning the apple trees that had been donated and planted in 2017 and had received little attention in the ensuing years.
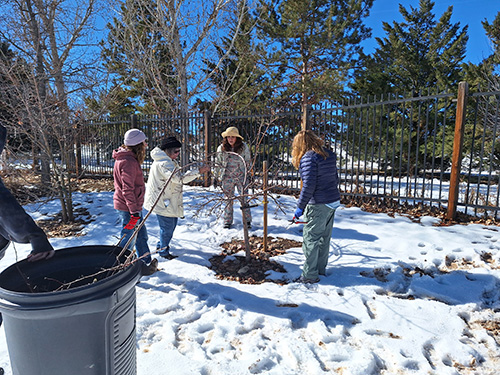
Master Gardeners pruned the community
garden’s apple trees –maybe for the first time ever – in February.
Weeding began in mid-February and continued throughout the growing season. Potatoes, asparagus, and peas were planted on March 17, and various cool-season crops were direct-seeded the first two weekends of April. The 42-foot-square row garden was laid out in April, and two double rows of onion transplants went in on April 25. The rest of the garden was planted May 13 through June 1.
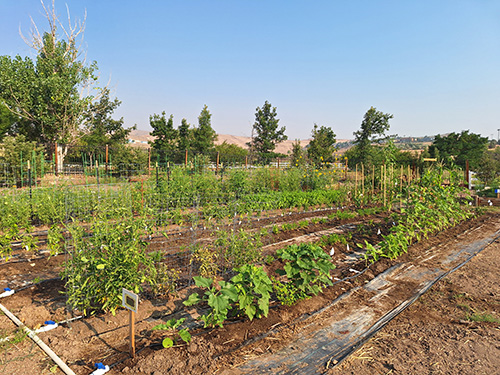
The row garden, now doubled in size, was planted from April through June.
In addition to the onion rows, the production rows included a cut flower row, three full rows of tomatoes, a 10-by-10-foot ornamental corn demo plot interplanted with pole beans and okra, and a 32-foot row of various sunflowers. The rest of the space was planted with Genovese basil, Italian parsley, California Wonder sweet peppers, several varieties of hot peppers, and Little Finger eggplant.
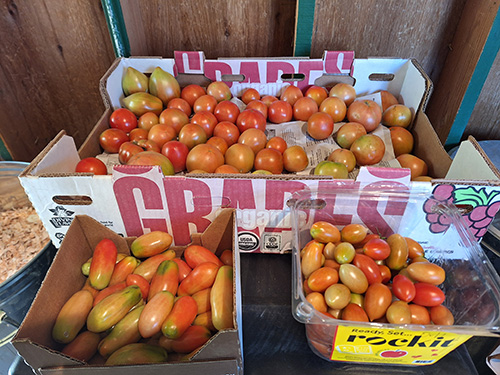
More than 750 pounds of produce was
donated, including tomatoes from the row garden.
More than 750 pounds of produce, most of it harvested from the production rows, was donated to the Reno-Sparks Gospel Mission, and floral arrangements were donated to the Washoe County Senior Center to brighten up their lunchroom.

The cut flower row produced floral
arrangements for the Washoe County Senior Center lunchroom.
Additional growing areas installed in the spring of 2024 included a raised bed planted with strawberries and rhubarb and in-ground asparagus and perennial herb garden beds. We also planted potatoes in two polyethylene “grow bags” to demonstrate this growing technique, and constructed a demo bed made of straw bales.
One corner of the garden was transformed
into a perennial herb bed, backed by sunflowers.
In addition to asparagus and onions, new crops planted this year included both determinate and indeterminate potatoes, okra, and parsnip.
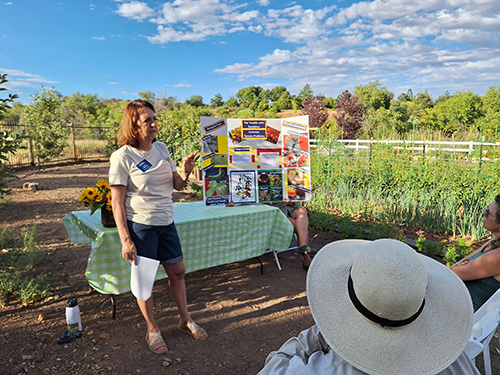
On summer evenings and at several public events,
the garden was the backdrop for informational talks by Master Gardeners and
interns. Here, MG Sonja Campbell discusses the finer points of growing tomatoes.
Multiple garden talks were presented in 2024, starting on April 28 at the park’s annual Farm Day when Master Gardener Angela White showed how to make watering devices like ollas. Ollas are earthenware pots buried in the soil and filled with water, which seeps out slowly to moisten the ground. The garden also had poster presentations on French Intensive and Square Foot gardening techniques.
Other Master Gardeners gave 11 garden talks in a series, held monthly on summer evenings from June through September, and presented five more in August when the garden was featured in the annual two-day Master Gardener Garden Tour. All these talks were free and open to the public. Additionally, Master Gardeners gave periodic “water break talks” to each other. These informal presentations covered various gardening techniques and topics like propagating irises and arranging flowers.
Thanks go out to the following Master Gardeners and interns who put close to 1,000 hours of sweat equity into the garden: Chris Doolittle, Angela White, Deb Barone, Deb Henderson, Deb Whitehouse, Elsa De Jong, Frances Munoz, Jill Strawder-Bubala, Milan Slikkerveer, Sara Marcus, Sharon Fabbri, Sheri Elena Quinn, Sonya Campbell, Suzanne Arney, Terri Farrell; Tricia Howarth, Valerie Ojeman, and Victoria Dexter. Their time and dedication made our “Garden With a Mission” a success this year.
The garden was put to bed in early November and planning is underway for the 2025 season. While the extension budget will cover some essentials like seeds and transplants, many additional supplies will be needed, including organic fertilizer and row covers to protect plants from frost, insects, and the Nevada summer sun. The park is also home to rabbits and ground squirrels, who find the garden irresistible. While the rangers set traps, it would be more effective (and humane) to dissuade vertebrate pests with chicken wire fencing and hardware cloth. We also need T-posts to erect the barriers.
Donations of any of the above may be dropped off at the Master Gardener help desk, which is open from 9:30 a.m. to 4 p.m. at the UNR Extension Office, 4955 Energy Way, Reno. For monetary donations, contact Rachel McClure, Washoe County Master Gardener coordinator, at mcclure@unr.edu.
Mule Deer Problems?
by Carrie Jensen
UNR Extension Urban IPM and Pesticide Safety Program Coordinator

Deer licking its nose, presumably after eating a satisfying meal in your garden.
Photo: Image by Yellow_dandelion from Pixabay
We’re not the only ones on the lookout for the first sprigs of spring’s new growth.
If you live in the Sierra foothills, such as in Verdi or Foothill Road in the Gardnerville area, then you are familiar with mule deer (Odocoileus hemionus) and the pressures that they can put on your yard or garden, especially when they are hungry after a long winter.
In the article, "Oh Dear! How do I Manage the Deer?", we take a look at how to manage deer pressures while coexisting with this important native wildlife species.
Preparing to Plant Tomatoes
by Beth Heggeness
A late winter snow or rain makes it easier to start preparing a Northern Nevada garden for spring planting. The soil gets a good drink, and moderate temperatures keep it from drying out too fast. It’s not time to plant tomatoes yet, but it’s not too early to prepare the planting site.
The spot you choose for tomatoes should get at least four to eight hours of sun. Tomatoes like medium-textured, fertile, soft, well-drained soil. Light sandy soils or heavy clay soils are more typical here, but both can be improved by adding organic material such as compost, peat moss, and aged manure. Many gardeners choose to plant in raised beds or containers, which improves drainage and makes soil-building a bit less of a chore.
The soil should be moist but not saturated. Working wet soil risks compacting it. First, remove any weeds and garden crop debris. Use a shovel, garden fork, tiller, or rake to loosen the top one to two inches of soil, and break up any clods. Deep rototilling is not really recommended for the garden because it disturbs the soil structure, but you can work the garden fork back and forth in the soil to gently loosen it.
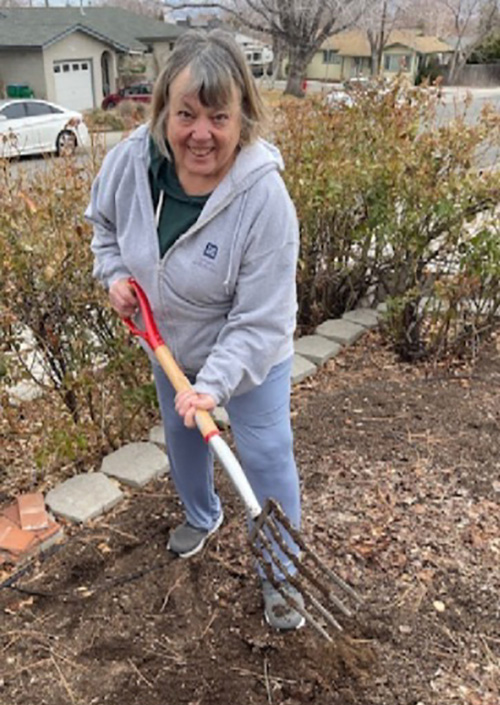
Beth loosening soil in her tomato bed with a garden fork.
Photo credit John Heggeness.
The light tilling will encourage existing weed seeds to germinate, so let that happen by irrigating deeply, waiting a week or two, then working the area lightly again to kill the tiny weed seedlings. Interrupting their early life cycle makes eradication so much easier!
Tomatoes grow best in slightly acidic soil with a pH of about 6.0 to 6.5, which can be another challenge in Northern Nevada, since many native soils are alkaline, with a pH of 7.0 or above. Soils also differ widely in their nutrient content. Organic material will improve soil structure and fertility over time, but supplementing the soil with commercial fertilizer as well can enhance tomato production.
All commercial fertilizers are labeled with a numbered ratio that indicates their content of the three main plant nutrients – nitrogen (N), phosphorus (P), and potassium (K). Tomatoes prefer fertilizer relatively low in nitrogen, high in phosphorus, and medium to high in potassium, so ideally you’d apply a fertilizer with an NPK ratio of something like 8-12-12. But they’ll also do fine with a standard 10-10-10 fertilizer. Apply to the garden bed before planting according to the rate directed by the label.
A soil test can eliminate guesswork about both pH and available nutrients, and you still have time to get a soil test before tomato planting time this year. The University of Nevada Extension Master Gardener help desk (775-784-4848, Tuesday, Wednesday, Thursday from 10 a.m. to 2 p.m.) can provide a list of soil testing labs and advice about collecting and preparing a soil sample.
When the weather is more settled, it will be time to set up irrigation. Tomatoes benefit from consistent, deep watering, preferably by drip lines or a soaker hose. Inconsistent or inadequate irrigation can induce blossom-end rot, a frequent problem in tomatoes. Overhead watering is not recommended.
Wishing you a fruitful tomato harvest in the 2025 gardening season.
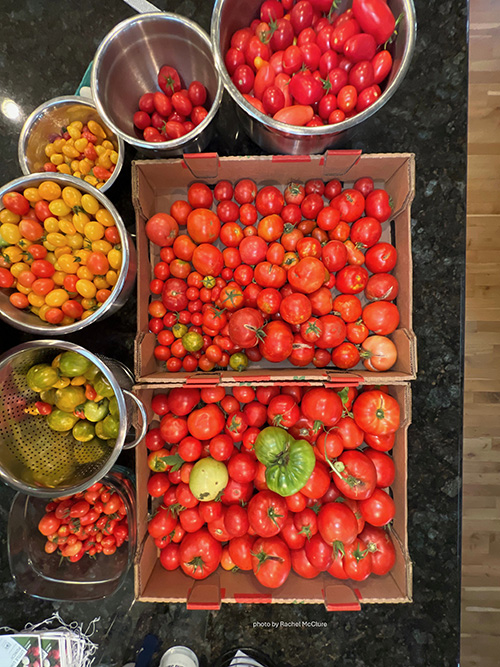
A bountiful harvest of tomatoes.
Photo credit Rachel McClure.
RESOURCES
- University of Nevada Reno Extension, College of Agriculture, Biotechnology and Natural Resources. “Growing Tomatoes in the Home Garden.”
- Utah State University Extension. “How to Grow Tomatoes in Your Garden.”
- Oklahoma State University Extension. “Growing Tomatoes in the Home Garden.”
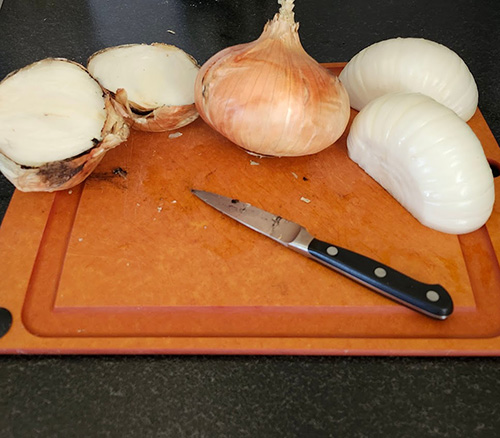
The Enigmatic Onion
Article and photos by Chris Doolittle
It’s among the most common of vegetables, ubiquitous in every pantry and an ingredient in thousands of everyday recipes. But for all of its familiarity, the onion is surprisingly misunderstood.
For one thing, it’s usually categorized as a root vegetable, like carrots and potatoes. But it’s actually a bulb, more closely related to a lily than a spud. It’s a member of the Allium family, like garlic and shallots. But unlike those vegetables, its edible bulb forms at the surface of the ground, not below it.
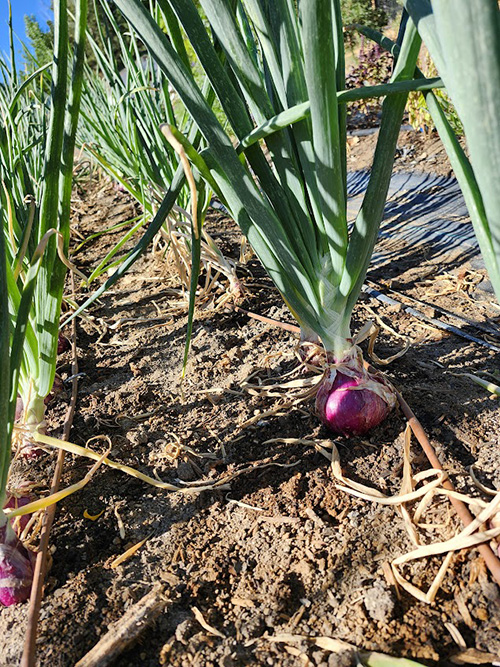
Unlike their Allium cousins garlic and shallots,
onions develop their bulb above ground.
Green onions, or scallions, can be easily grown from “sets,” which are the tiny onions that many garden centers and catalogs offer by the bag in the spring. But don’t be fooled by the pictures of big, juicy onions sometimes used to illustrate those sets. But if you want to grow large onions for storage, you will need to either buy transplants or start your own from seed. That’s because onions are biennials. They produce foliage and an edible bulb the first year, and seed in their second year. Sets are already at the beginning of their second year, and their real job is to make seed. When an onion grown from a set starts to send up a flower stalk, pull it and eat it. The flower stalk extends through the bulb, which will not dry properly for storage.
Many garden centers also sell bundles of transplants, which look like baby green onions, and you can order transplants online. If you choose to start your own from seed, start early! It can take a full 10 weeks to get an onion seedling big enough for transplanting. Since they need to be planted outdoors early – as early as mid-April in northern Nevada – you’ll want to seed them indoors in early February. The seedlings can be moved into individual cells when they are five or six inches tall, and ideally will have three leaves when you transfer them to your garden.
Onions need well-drained soil in full sun. They are shallow-rooted, so they don’t need deep, friable soil, like you’d need for real root crops like parsnips and potatoes. But onions can’t forage far for water or nutrients, so they need ample irrigation, applied close to the plant, and plenty of fertilizer – think ravenous teenager.
Give them their first meal before planting. The ideal starter fertilizer is 10-20-10 at the rate of one-half cup per 20 feet of row. That’s not an easy ratio to find in garden centers, but you can mix triple phosphate (0-46-0) into 10-10-10 fertilizer at the rate of 3.5 oz. to 1 pound and get a close approximation. Follow that up with a side-dressing of ammonium sulfate or other high-nitrogen fertilizer every three weeks through the growing season.
That may sound like a lot of fertilizer, but the ultimate size of an onion depends entirely on the number and vigor of its hollow, spiky leaves. Each of those nitrogen-loving leaves will become a juicy layer in the bulb that will eventually be harvested, so your goal is robust plants with at least 12-14 tall, sturdy leaves. Be sure the onions get at least an inch of water a week, too. Driplines with 6” spacing work well.
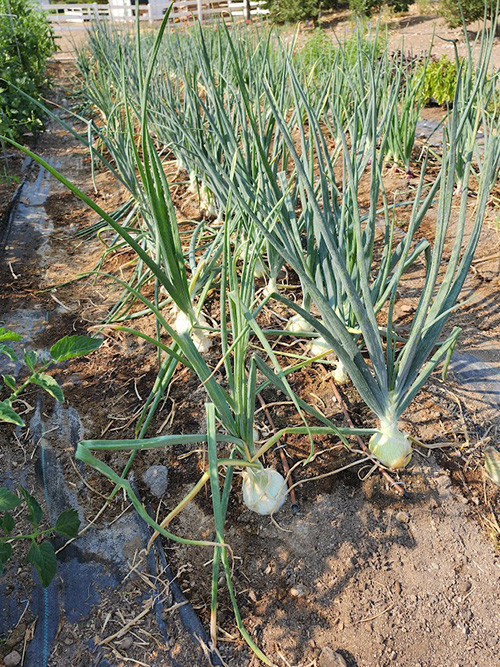
Be generous with nitrogen and water to grow tall,
sturdy leaves, and fat, juicy onions will follow.
Don’t plant the transplants deeper than about 1”. They need space above the roots to form their eventual bulb. Because their leaves grow upright, they can be planted close together. You can put transplants as close as two inches apart in double rows that are six inches apart, and pull every other plant for green onions through the growing season.
When selecting varieties of onions to grow, you will need to keep your latitude in mind. Onions are categorized as short-day, long-day, or intermediate, depending on how much day length they need to initiate the bulbing process. Short-day onions will start to mature when daylight length reaches 10 to 12 hours. Long-day onions start to mature when daylight length reaches 14-15 hours. Intermediate varieties will start to bulb when day length is 12-14 hours. Both long- and intermediate-day onions mature in approximately 100 days, so a crop planted in mid-April should be expected to mature by mid-July.
Generally, long-day onions are grown in USDA Zones 6 and below, and short-day onions in Zone 7 and above. Northern Nevada is suitable for either long-day or intermediate varieties. You can also grow short-day onions here, and they will mature faster than they do in the south (75 days rather than 110 days). But they won’t get as large in the north as they do in the south. And they won’t store long, because most short-day varieties are sweet (think Vidalia, Texas Sweet and Maui), which have shorter storage lives.
Three to three and a half months after being transplanted, onion leaves will start to yellow at the tips and the neck will shrink. Eventually the plant will topple over.
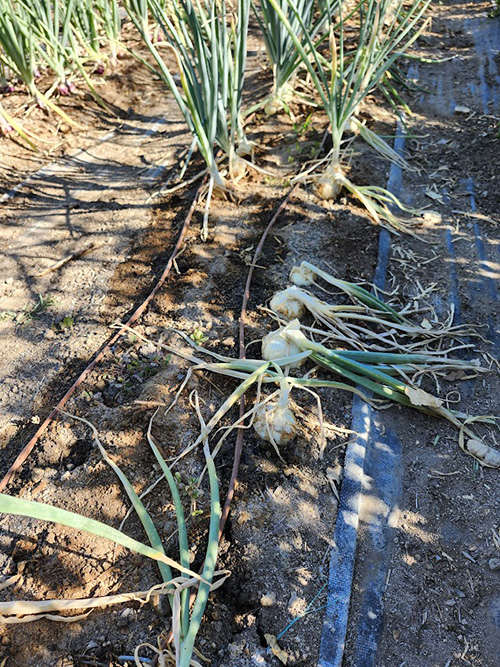
As they mature, onion plants draw moisture from
the leaves into the bulb and eventually topple over.
When about half of the onions have fallen over, some growers advise knocking over the remaining plants and cutting off the irrigation water. I prefer to cut the irrigation back but not completely off, and wait until most of the onions fall over naturally. The neck needs to be pretty darn dry if the onion is to cure properly.
After pulling the onions, take them indoors and hang them head down on a rack. Don’t wash them or cut back the tops at this point. The tops need to dry all the way to the bulb to prevent the entry of bacteria that would spoil the onion.
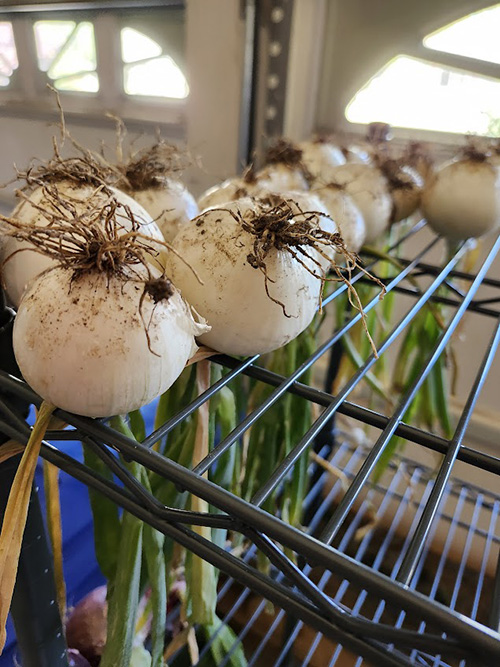
Onions curing on a repurposed seedling rack.
The drying area should be well-ventilated and out of direct sun to avoid scalding the onions. The onions should not touch each other as they dry. When they are completely dry, clip the roots and cut the tops back to one inch. Store in a cool, dry place. Check the onions regularly and use any that are developing soft spots or sprouting.
How long will they store? The sweeter the onion, the shorter the storage life, so use the sweet ones first. Vidalia, Walla Walla and Maui sweet onions (all grown from Yellow Granex transplants) typically have no more than a one-month storage life. Most red onions should be good for three to five months. Yellow onions generally have longer storage lives, and if well cured and properly stored, should be good for eight to 10 months.
Yellow onion varieties have the longest dry storage
life, up to 10 months. And they freeze well, too.
You can also store onions in plastic bags in your freezer – whole or chopped, raw or cooked.
Onion crops should ideally be grown no more than one year in four in the same area to avoid a buildup in blight and viral diseases. Poor drainage can induce rot. Onions can also be troubled by thrips, which attack the leaves, and onion maggots, which are the larvae of the root maggot fly.
Scouting for Early Spring Winter Annual Weeds
Photos & article by Melody Hefner
So far, we’ve had a mild, dry winter, recently followed by a bit of rain and snow. A little increase in temperature could help initiate weed growth. Bare areas in your landscape are open invitations for weed growth, so start scouting now for weeds, especially if you had an infestation last year.
This article focuses on what are called winter annual weeds - a bit of a misnomer, since it refers to plants that germinate in the fall, winter over in the soil, and revive to sprout in the spring. As with all annuals, these plants have but one job: producing seed. You have one job if you want to control them: prevent seed production.
Seedlings are easy to control. They do not have a substantial root system yet, so they are easy to pull or hoe. Many will not resprout after being removed, so you will have just controlled your infestation.
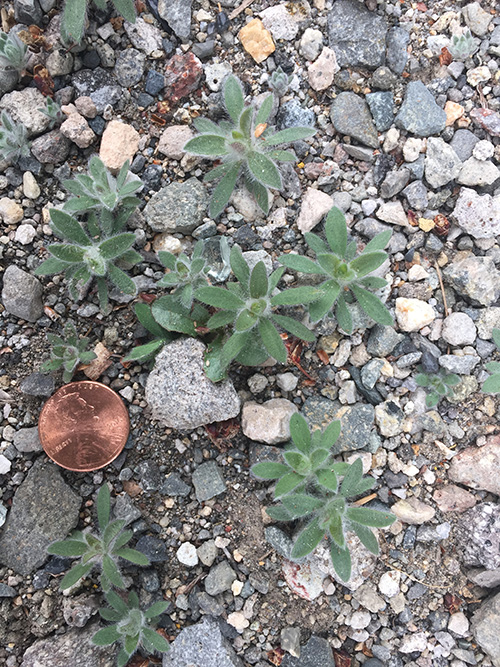
Bur buttercup has a short growth habit with yellow
flowers that produce painful burs when it goes to seed.
Photo credit Wendy Mazet Hanson.
One problematic early spring-blooming weed found in our area is bur buttercup. Bur buttercup grows only two to five inches tall. It seems innocuous and cute, with its short growth habit and little yellow five-petal flowers, but as the plant matures, each flower forms a ½-inch to ¾-inch sharp bur. These burs are painful to humans, pets and wildlife. Now is the time to pull these little plants before the nuisance burs form.
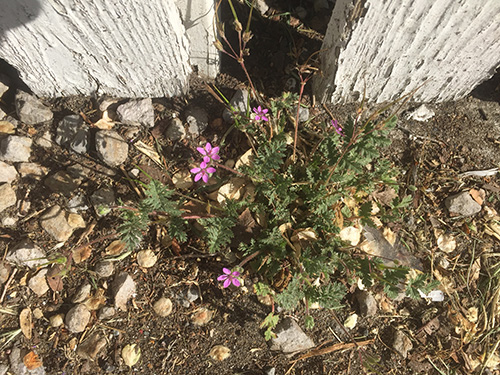
Redstem filaree in bloom. Notice the identifying
characteristics of purple-pink flowers, lacy leaves and red stems.
Another weed that is starting to bloom now is redstem filaree. The leaves of this plant are lacy and fern-like, forming a low-growing rosette. When the plant blooms, it forms small purplish-pink five-petal flowers. The seed it produces resembles a stork’s bill and it gets caught in clothing and pet fur. This weed grows in wet areas where it finds little other plant competition. To prevent infestations in lawns, reseed to fill in the bare spots in your lawn and mow high (three inches or higher). To control the redstem filaree you have now, remove the plants while they are still young and easy to pull, or apply a broadleaf-selective herbicide that will kill the weed without harming the turfgrass.
The lacy rosette of a flixweed seedling.

Tumble mustard rosettes look similar to dandelions.
Mature flixweed in bloom.
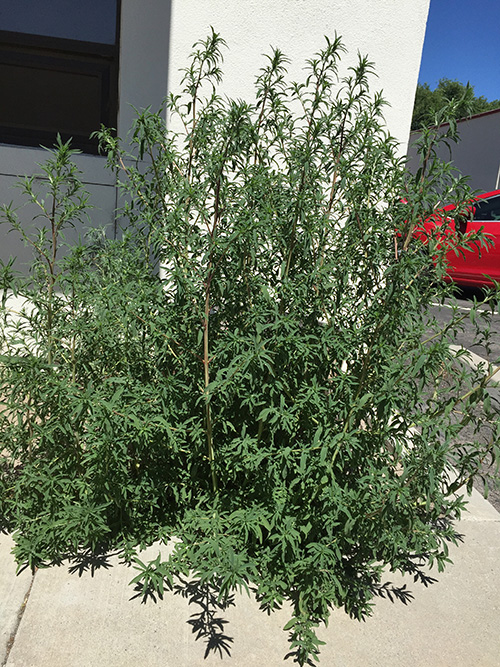
Bare areas can also become infested with flixweed, tumble mustard and kochia seedlings. Flixweed forms a lacy rosette as a seedling. Tumble mustard seedlings also form a rosette, similar in appearance to dandelions. Both will quickly grow to two feet tall and are prolific producers of seed that will live a long time in the soil.
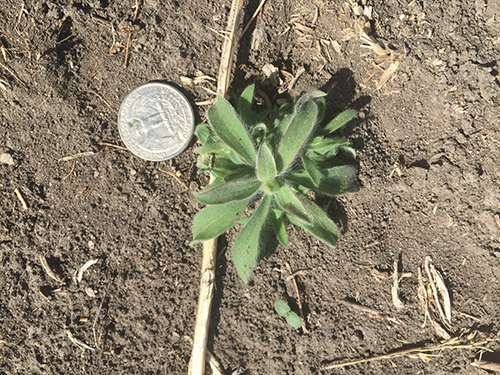
The small rosette of kochia’s lance-shaped, fuzzy, gray-green leaves.
The easiest time to control kochia plants is when they are small seedlings.
The Christmas tree shape of full-grown kochia.
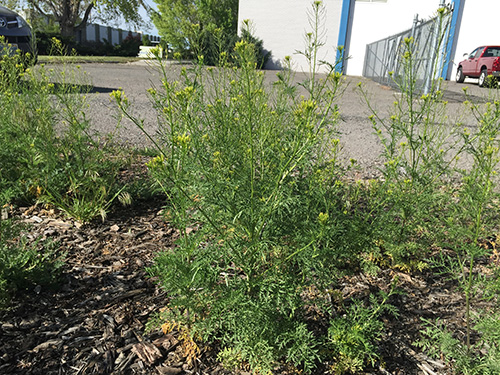
Kochia forms a small rosette of lance-shaped, fuzzy, gray-green leaves. It seems like such a pretty little plant that many people don’t pull it right away. In no time at all, it can grow into a highly branched, one- to six-foot-tall Christmas tree-shaped plant that is difficult to pull. Remove these weed seedlings now, while they are young and easily controlled. The more mature the plant, the harder it is to pull. Additionally, if you opt for chemical control, herbicides are much less effective on mature plants, and you will have to use more product to cover the large plants.
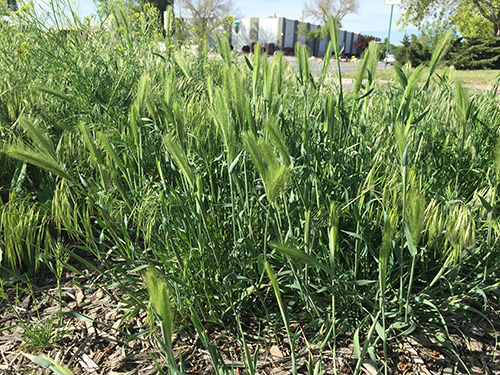
Hare barley has upright double-sided seed
heads while cheatgrass has nodding seedheads.
Of course, we can’t forget to scout for the early spring grasses that are common weeds in our area. Cheatgrass is ubiquitous in our area. This winter annual grass sprouted last fall, then went dormant. It is so competitive because it can start growing when the soil is still very cool, before other winter annuals break dormancy and long before summer weed seeds even sprout. It can take advantage of the soil water and nutrients with no competition.
Cheatgrass can grow from four to 30 inches tall but usually tops out at six to eight inches. It starts out bright green, then turns reddish and eventually brown at maturity. It has nodding seed heads, and each seed has an awn that is 3/8 to 5/8 inches long. The awns cause the seeds to stick in animal fur and human clothing, especially socks!
Another common winter annual grass is hare barley. It grows four to 12 inches tall with sparse green grass blades. When young, it is not as bright green as cheatgrass, and it is tan in color at maturity. It forms a seed head that looks like wheat, with seeds on both sides of the stem. These seeds also have awns that are less than an inch long. Like cheatgrass, the awns get stuck in animal fur and human clothing.
Neither cheatgrass nor hare barley is controlled by mowing; they will regrow. The good news is they have very shallow roots and can be pulled or hoed easily.
Start scouting now for these winter annual weeds. Pull or hoe them before they set seed and add to the seed bank in your soil!
Transplanting Seedlings Indoors and Out
photos & article by Rod Haulenbeek
In the December 2024 newsletter, I wrote about planting seeds. By now, those seeds have sprouted into baby plants. The plants will be planted in the landscape in April or May.
Transplanting Indoors
Some plants have roots that have outgrown their small planting containers, and need to be moved into a larger container to keep growing. Using a dinner fork, I lift the planting medium around the plant to inspect the roots; if they appear healthy, I excavate a space in a larger container, move the plant into the larger space, and gently tuck it in. Then I water to settle the medium and prevent air bubbles from drying out the roots.
Growing seedlings also need nutrients. If you transplant into a planting mix containing fertilizer, you needn’t add any more. If the planting mix doesn’t contain fertilizer, add a fertilizer of your own choosing. A weak solution of houseplant fertilizer is fine.
Transplanting Outdoors
Once the plants are ready for transplanting outdoors, they need to be “hardened off.” The indoor growing environment has a narrow temperature range, but the range is much larger outdoors, and the plant’s tender tissues need to be toughened up by exposure to strong light and wind. I put the plant in a protected, shady spot and bring it into the garage at night for the first two days, then put it into a spot that gets some sun and more exposure for the next two days. For perennials, hardy annuals and “cool season” vegetables such as lettuce, beets, and spinach, this will suffice.
Less hardy crops will need a bit more coddling. A prized seedling turned into a black, sticky mess by an untimely cold night is truly a sad sight to behold. But that fate is preventable with frost protection. An empty milk jug or two-liter bottle, placed over the plant, lets air, light, and water in and keeps the plant two degrees or so above that of the surrounding air, enough to survive a light frost. Commercial covers of spun polyester, marketed as frost blankets or row covers, do the same job, and can be reused.
Tomatoes, peppers, and cucurbits like squash and cucumbers are extremely sensitive to frost, and for these I use a product called Wall of Water. It’s essentially an 18-inch-tall teepee constructed of translucent plastic tubes. You fill the tubes with water and erect the teepee over your plant. They are said to provide frost protection down to 17 degrees, but the contraption has no frame, so the wind could knock it down, crushing the plant inside. To prevent this, I push a tomato cage upside down over the plant, and install the Wall of Water over it. You can also support the teepee with a temporary tripod of bamboo stakes.
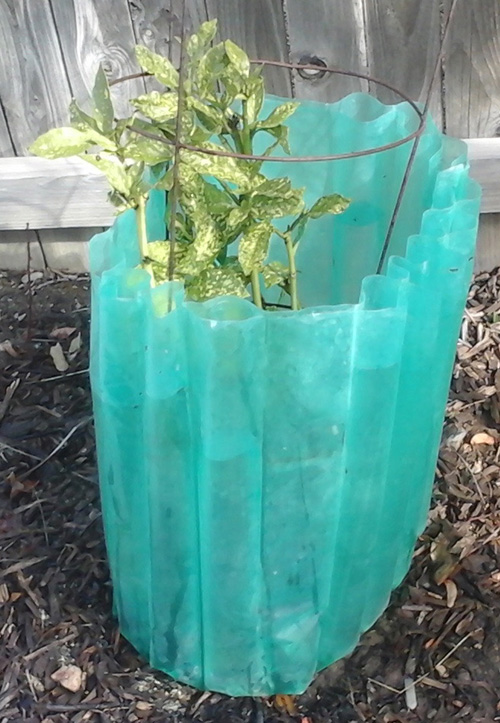 Wall of Water erected outside a tomato cage, which provides wind support.
For information about when to transplant specific flowers and vegetables, contact the Master Gardener Help Desk line, 775-784-4848, or email extensionwashoemg@unr.edu.
Understanding Fertilizers
Photos and Article By Becky Colwell
Spring is here and plants are starting to green up. Is it time to give them an extra boost by adding fertilizer to the soil? Maybe, but before you start, get a soil test to learn what nutrients are naturally in your soil. Then think about the type of plants you have and their nutrient needs.
Most trees shrubs, and perennials grow well without supplemental fertilizer. Fertilizers are not plant food; they provide nutrients that help the plant make its own food, in the form of carbohydrates, proteins, and defense compounds. Too much fertilizer can be harmful, by encouraging excessive foliage or stunting growth, hampering production of flowers or fruits, and inviting insect pest attacks and disease. Excess fertilizer can also run off into storm drains, causing pollution in our waterways. When fertilizing, more is rarely better. With this in mind, here are some general guidelines to help you choose the right fertilizer for your needs.
There are 14 mineral nutrients considered necessary for plant growth. Some, called macronutrients, are needed in large amounts and are more likely to be deficient in your soil. Others – micronutrients – are needed in very small amounts.
Primary macronutrients are nitrogen (N), phosphorus (P), and potassium (K).
- Nitrogen promotes green, leafy growth. Too much nitrogen causes excessive, tender growth, which can attract pest insects such as aphids, inhibit flower formation, and delay fruit set.
- Phosphorus stimulates early root growth and hastens blooming. But applied in excess, it may wash out of the soil and into storm drains, potentially causing overgrowth of algae in waterways.
- Potassium promotes a plant’s general health.
Secondary macronutrients are calcium (Ca), magnesium (Mg), and sulfur (S).
- Calcium contributes to vigorous root growth and helps regulate the uptake of other nutrients. A calcium deficiency combined with inconsistent watering will result in blossom end rot of tomatoes.
- Magnesium helps plants use phosphorus and form chlorophyll.
- Sulfur plays a role in dark green foliage color, stimulates seed production, and helps the plant form amino acids and vitamins.
Micronutrients are boron, copper, iron, manganese, zinc, chlorine, molybdenum, and cobalt. These are necessary in tiny amounts as they work with the macronutrients to provide a balanced diet to all plants, and usually are found naturally in the soil.
The three numbers on the packaging front of all fertilizers represent the primary macronutrients and are listed in this order; nitrogen (N), phosphorus (P), and potassium (K) or N-P-K. The numbers represent the percent by weight of each element in the fertilizer’s formula. Balanced fertilizers have the same ratio numbers (like 10-10-10). Fertilizers that have all three elements but in different ratios (like 8-4-4) are called complete fertilizers.
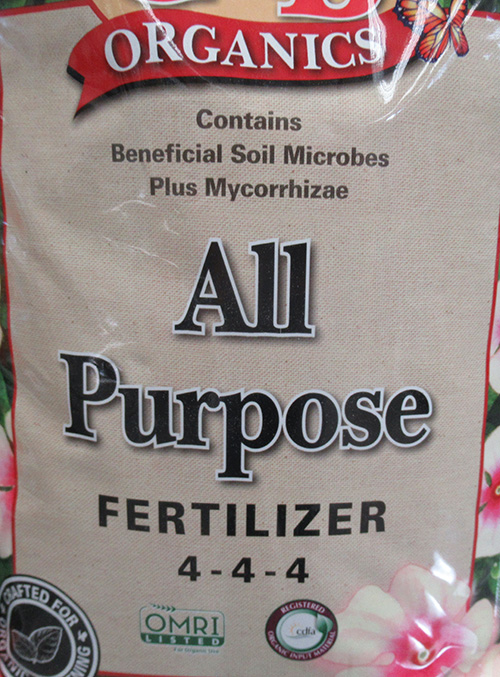
The 4-4-4 represents a balanced fertilizer.
It supplies nitrogen, phosphorus, and potassium in equal amounts.
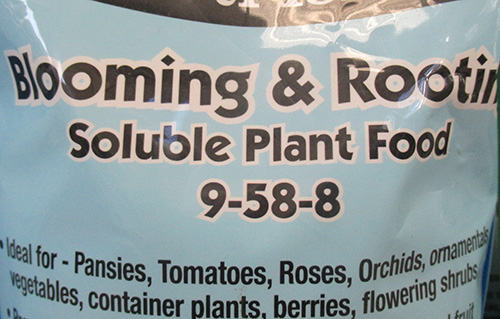
This fertilizer is a complete one, as it supplies all three of
the primary macronutrients. But it is not a balanced fertilizer.
Its N-P-K ratio of 9-58-8 means it has a high phosphorus (P) content to stimulate
root growth and blooming, a critical need in ornamental perennials and fruiting plants.
Fertilizers may be made from organic sources (like manure, feather meal, and bone ash) or inorganic ones (like ammonia and mined phosphorus and potassium). Deciding whether to use organic or inorganic fertilizer depends on your long-term gardening goals. The ideal way to feed your plants is to build healthy soil with high organic content, but that takes time, especially in our poor Nevada soils. In the end, plants don’t have a preference as to what the nutrient source is, only that the nutrients they need are available.
Inorganic fertilizers are made from synthetically derived materials, and manufactured using large amounts of natural gas. Being water-soluble, they can be used by the plant immediately, providing a quick hit of nutrients and rapid growth. In excess, however, ammonia or urea-derived nitrogen can inhibit root growth. And because these fertilizers are water-soluble, they are not available to the plant long-term and the excess can leach into waterways. To prevent leaching, it is best to choose inorganic fertilizers that are labeled slow- or controlled-release. If not using slow-release types, then small fertilizer applications must be made periodically, not all at once. Inorganic fertilizers feed the plant, not the soil.
Healthy soil is a more effective way to feed plants long term. Amending the soil with organic matter provides food for the microorganisms living there and improves the soil structure, increasing its water-holding capacity. The microorganisms turn the organic matter into available nutrients and micronutrients needed by plants. Organic fertilizers, which are readily available in formulations that meet the needs of most plants, naturally release their nutrients slowly. As soil organic matter increases, the need for supplemental fertilizer decreases. Thus the saying “feed the soil, not the plant.”
Organic fertilizers are readily available at nurseries
and box stores, in almost any nutrient combination a gardener might need.
Fertilizer application tips:
- Read and follow the label directions for application, regardless of what type of fertilizer you decide to use.
- Fertilize container plants in potting soil regularly during the growing season.
- In general, do not fertilize newly planted perennials, trees, and shrubs in their first season; regular watering to aid in root establishment is more important.
- Fertilize outdoor plants in the cooler parts of the day.
- Avoid fertilizing drought-stressed plants.
- Avoid late summer and early fall fertilization as this can cause late leafy growth that can be killed by winter frosts, interfering with plant winterization.
- When possible, mix fertilizers into the top few inches of soil and then water in to distribute nutrients throughout the soil.
References:
- Traunfeld, Jon; “Garden Fertilizer Basics,” University of Maryland Extension, October 2020.
- Reill, Sally; “A Guide to Understanding Fertilizers,” Oregon State University Extension Service, January 2019, Reviewed 2024.
- Steil, Aaron; Thoms, Adam; Nair, Ajay; Nonnecke, Gail; “Fertilizing in the Home Garden,” Iowa State University Extension and Outreach, Last reviewed June, 2024.
- Kratsch, H.; “Fertilizing Your Vegetable Garden,” University of Nevada Reno Extension, Fact Sheet 10-68, 2010.
- Kirk-Ballard, Heather; “Timing is Everything With Fertilizer,” LSU College of Agriculture, April 22, 2022.
What’s Cooking in My Garden?
Photo and Article by Beth Heggeness
I’ve lived since 1978 in what is called “old Northwest Reno,” and one phrase I’ve heard often over the years is the adage “plant peas when the snow is gone on Peavine Mountain.”
This spring, I intend to relive a memory from my first Nevada-owned home by planting peas, specifically snow peas. If you are reading this article in March, NOW is the proper time to plant peas in your Northern Nevada garden, regardless of what you see on Peavine Mountain.
Pea seeds are large and easy to plant, perfect for a child’s gardening project.The seeds germinate in seven to 10 days and may be harvested about 65 to 70 days later. Peas thrive in Northern Nevada’s cool spring weather. They’re easy to harvest, and their sweet crunch is delightful, eaten raw or cooked minimally.
I must admit I was not fond of peas as a child, and canned peas are still not my thing. I’m really glad my mom embraced the idea of frozen vegetables (much more palatable), and I tend to keep frozen baby peas on hand. But I never craved them until they became popular as a raw vegetable. Snow peas and snap peas are a delicious raw veggie treat, though some varieties benefit from removing the “string” that runs like a zipper down the pod from stem to tip.
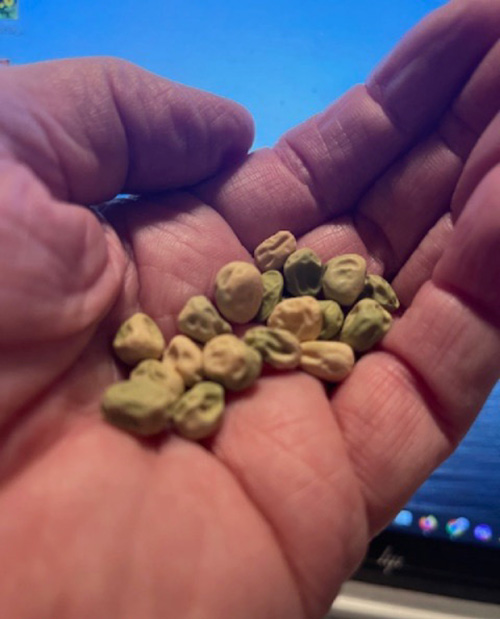
A handful of pea seeds ready for planting.
Pea seeds are planted directly in the ground, not grown from transplants, but keep in mind that our gardening environment can be challenging even for these hardy vegetables.
According to UNR Extension experts Heidi Kratsch and Wendy Hanson Mazet, Northern Nevada has three food-growing seasons: early spring, summer, and early fall. The traditional garden opening day is St. Patrick’s Day, March 17, when the soil temperatures reach about 40 degrees Fahrenheit, ideal for English peas, snow peas, sugar snap peas, sweet peas, and spinach. If your garden runs a little on the cool (or warm) side, local garden centers offer soil temperature measuring tools.
Follow the directions on the seed packet for spacing plants and rows. After planting and germination, you will want to provide support for the growing plants, which tend to vine. Even the “bush” types benefit from a little help staying upright, and tall varieties demand it. A simple trellis is made of vertical stakes with either string or netting attached to them. I’m personally delighted by how the pea stems throw out slender tendrils to wrap around and climb the trellis.
Harvest snap peas and snow peas when the seeds inside the pods are barely noticeable – the pod itself is the treat. English and sweet pea pods need to be filled out before harvesting, but they, too, are best when the peas are still green and tender.
Another benefit of peas is that they are capable of pulling nitrogen from the air and, with the help of bacteria that live in their roots, “fixing” it into the soil in a form that plants can use.
Peas don’t do well when the soil temps rise into the 70s and 80s, so they aren’t a good summer crop. But they can be sown again in late August or early September, when the soil cools in the shorter days of fall, for an autumn harvest.
When my dad became my mom’s caregiver, he often expressed some frustration about what to cook for dinner. I wrote out a recipe for my version of stir fry, hoping to help him out with a fast, fresh dinner meal. Snow peas are always a wonderful addition to stir-frys.
Beth’s All-Purpose Stir-Fry Recipe for Two
About one hour before cooking:
Thinly slice (about ¼”) 6-8 oz. uncooked beef, chicken, or pork. You may also use six large shrimp, or six to eight large scallops, quartered. The meat is easier to slice if it is only partly defrosted.
Toss meat slices with:
2 tsp. olive or sesame oil
2 cloves garlic, minced
2 tsp. minced fresh ginger
2 tsp. lite soy sauce
2 tsp. ground coriander
Let marinate for about one hour. If it will be standing longer, refrigerate the bowl.
Prepare two cups per person of raw vegetables, sliced into bite-sized pieces. Vegetables good for stir frying include asparagus, bok choy, bean sprouts, broccoli, celery, peppers, green beans, carrots, onions or green onions, mushrooms, snow peas, and canned bamboo shoots and water chestnuts.
Spray skillet or wok with cooking spray, add two tsp. of sesame or olive oil, heat to medium-high temperature, add marinated meat mixture and marinade, and stir until slightly cooked on both sides. Stir in vegetables in order of cooking time. Mushroom, carrots, celery, broccoli, onion, and green beans take the longest; next to add would be asparagus, green onion, pepper, and any canned veggies. Add bean sprouts, bok choy, and snow peas last – they take only a few minutes. Do not overcook.
At the last minute, add one cup of low-sodium broth mixed with two tsp. cornstarch and cook until the broth is clear. Divide evenly and serve over two-thirds cup rice per person. Enjoy!
Resources
https://extension.psu.edu/a-gardeners-guide-to-peas
https://extension.unr.edu/publication.aspx?Pubtitle=2099
https://extension.unr.edu/publication.aspx?Pubtitle=3168
Green Blood for Pets
Photos & article by Diane Miniel
I have pets that migrated with me to Northern Nevada: Twinkie, a 10-year-old chiweenie (chihuahua-miniature dachshund mix), and Lily, a 3½-year-old tuxedo cat. Since starting to garden in 2022, I've had the goal of growing greens for my pets.
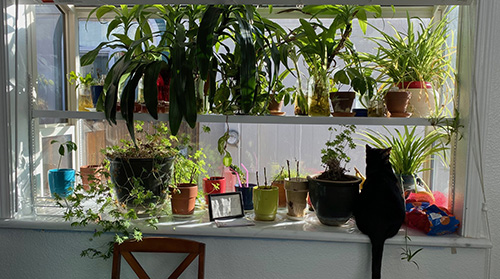
Lily in the garden window.
Most pet owners have observed their pets munching on grass now and then. Grass is known to improve digestion and supplement their diets with vitamins and minerals. My chiweenie can romp around our backyard chomping on greens, but my tuxedo grandcat (my daughter’s cat) is under house arrest because of the cat-eating coyote population here in Northern Nevada. Fortunately, I have a garden window in my kitchen where Lily can chew on wheatgrass.
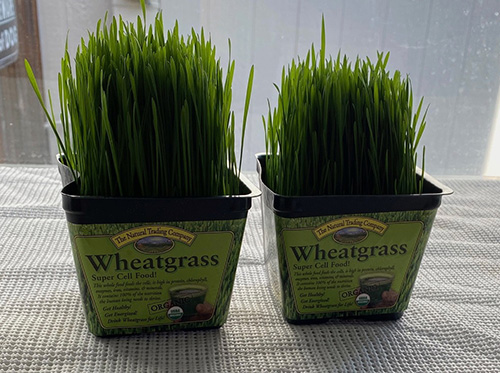
Store-bought wheatgrass.
I grow my own wheatgrass from seed, so I’m sure of what grass I’m growing and what it is grown in. Nurseries might use toxins to battle molds and fungi, and park grass can be sprayed with toxic chemicals. Pest companies use similar kinds of poisons in and around our homes and neighborhoods. Even gardeners can use a variety of poisons that might be ingested by our pets.Thus, as a caring pet owner and conscientious gardener, I believe that growing my own wheatgrass can provide my pets with healthier and more nutritious greens.
Studies have identified many potential benefits of eating wheatgrass. Inflammation is a factor of disease in animals, and wheatgrass (Triticum aestivum Linn) is both an anti-inflammatory and an antioxidant. Wheatgrass, nicknamed “green blood,” is a rich source of chlorophyll, which has been found to be an antioxidant and to have anti-inflammatory and antibacterial properties.
It’s also fast and easy to grow. Seeds sprout in three to five days and grow to nibbling size in 10 to 15 days. I can plant a tray every few weeks and place it in the garden window for Lily's consumption. The grass does grow more quickly in warmer months.
To enhance the vitamin content in wheatgrass, some researchers encourage supplementing the soil with seaweed and plant-based compost. It also should be eaten before it forms seeds, because the plant redirects its nutrients to its seeds, leaving the grass itself less nutritious.
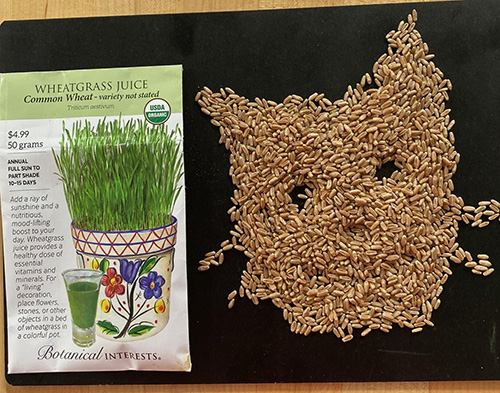
Wheatgrass seed packet and seeds.
Follow the packet directions to plant the seeds. My seed packet said that the number of seeds were sufficient to sow 80 square inches of soil, or an 8-by-10-inch container, and that they should be soaked in water for 12 to 24 hours.
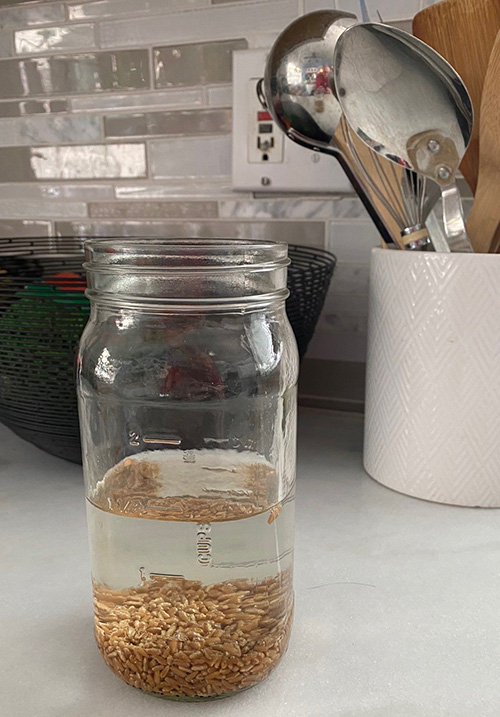
Wheatgrass seeds soaking.
While you can plant the seeds in soil, I simply continue to rinse the seed daily until they sprout (three to five days). Then I put them into a tray with a little water. I continue to add a little water as the plants use it, but don’t overwater. After 10 to 15 days, the young grass blades are mature enough to eat.
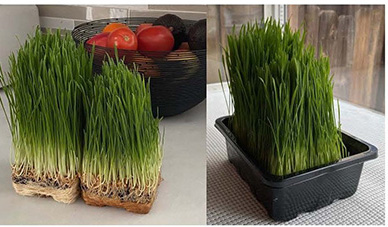
Mature wheatgrass outside and inside a tray.
Unfortunately, Twinkie is a finicky eater and not a connoisseur of wheatgrass (I call her bikini-twini because I imagine she wants to fit into her dog bikini year-round). I must be sneaky when feeding her anything green. I’m not always successful in coaxing her to munch on the chopped wheatgrass I put in her bowl.

Twinkie with her favorite stuffed toy.
Consequently, this spring, my garden plans include a backyard patch of grass for Twinkie. Many websites recommend “pet friendly” lawn options. By that they mean grasses that are more pet-tolerant, not necessarily more nutritious, which is a factor pet owners should consider when planting grass.
But pasture researchers agree that newly sprouted pasture grasses have more nutritional value than mature grass, which doesn’t have as many total digestible nutrients and not as much protein. Just as with wheatgrass, when grass produces seeds, its nutritional value decreases significantly. The same is true for young clover and alfalfa, which are legumes rather than grasses. While wheatgrass is not a commercial lawn or pasture grass, the research suggests that young grasses overall are more nutritious than older ones.
As I scope out a spot for Twinkie’s turf, I ponder which grass she might prefer over the others. I’ve decided on a blend of Kentucky Blue Grass and Bermuda, called Bluemuda, because it combines cool and warm grasses that might do well in my Northern Nevada backyard. Whether my dog likes their taste, I will have to wait and see. For now, I’ll continue to sprinkle chopped wheatgrass on her food and on my own salads, too.
References
- Filley, Shelby. “Nutritional value of pasture forages changes through growing season,” Oregon State University Extension Services, April 2024. https://extension.oregonstate.edu/crop-production/pastures-forages/nutritional-value-pasture-forages-changes-through-growing-season
- Gore, Rucha Diwakar, Sangeeta Jayant Palaskar, Anirudha Ratnadeep Bartake, “Wheatgrass: green blood can help to fight cancer,” Journal of Clinical & Diagnostic Research, 1 June 2017. https://pmc.ncbi.nlm.nih.gov/articles/PMC5534514/
- Hunter, Philip. “The inflammation theory of disease: the growing realization that chronic inflammation is crucial in many diseases opens new avenues for treatment,” EMBO Reports, 9 Oct. 2012. https://pmc.ncbi.nlm.nih.gov/articles/PMC3492709/
- Padalia, Swati; Drabu, Sushma; Raheja, Indira; Gupta, Alka; Dhamija, Mamta. Maharaja Surajmal Institute of Pharmacy, “Multitude potential of wheatgrass juice (green blood): An overview,” Chronicles of Young Scientists, 5 March 2010. https://www.luzvida.com/articuloscientificos/Multiples_potenciales_del_wheatgrass.pdf
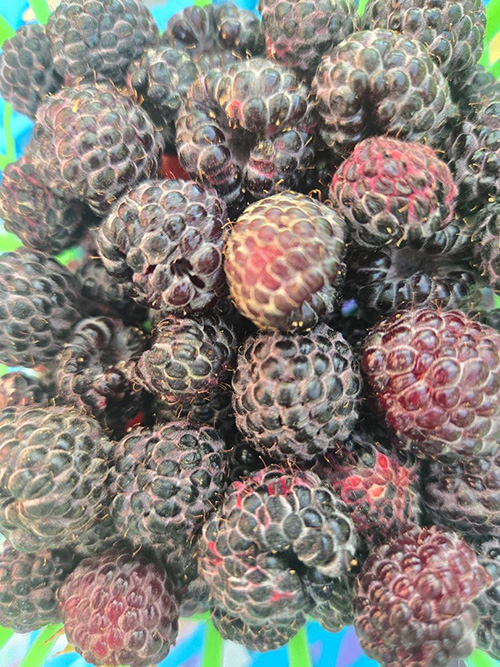
A Jewel in My Garden
Photos and article by Liz Morrow
Several years ago, Master Gardener volunteers working in a demonstration garden on Joule Street, around the block from the Extension Office, were offered raspberry plants left over from our annual plant sale. Not one to let a free plant pass me by, I gladly took a plant home and planted it among the Heritage raspberry rows in my garden.
As this plant grew, it didn’t look like any raspberry plant I had ever grown before. The canes had a light green, grayish tint to them. The berries were hard as can be, and the color was not like that of the fruit on my other raspberry plants. I was tempted to remove the plant. But as often happens in the garden, other tasks took my attention and I left the plant alone, just to see what would happen. This was definitely one of my greatest garden experiments. The plant I got from the Joule Demonstration Garden was a real jewel – a Jewel Black Raspberry. Not a blackberry, a black raspberry.
While they are from the same genus, they are not the same plant. Blackberries (Rubus subsp. rubus) are a solid fruit with a spongy center. Black raspberries, derived from two native species (R. leucodermis and R. occidentalis) are hollow inside, like red raspberries, because they separate from their stem when plucked.

This cluster of unripe berries is very tight and hard to the touch.
When ripe, they’ll turn black and be easy to harvest.
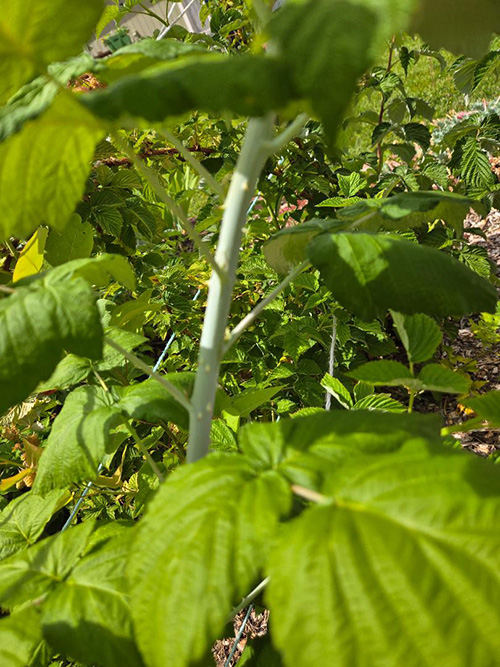
The new canes have a light grayish-green color.
It was time to start researching just what I had put in my garden – a good idea unless you want to express your adventurous side. Black raspberries are summer-bearing and fruit after the red and gold raspberries. The Jewel variety is derived from a North American native plant. It is heat- and drought-tolerant and good for zones 3 through 9. The plant thrives in sandy soil high in organic matter, covered in thick mulch. The vines are very thorny; some have described them as “razor wire.” Gloves are a must when handling this plant.
While the crowns are perennial, the canes are biennial. First-year canes, called primocanes, grow for one year, but do not flower and fruit until the second year. Then they die. The dead canes are removed at season’s end; new canes that grew during the season will bear the next year’s crop.
The tips of primocanes often grow downward to the soil in the fall, where they take root and become new plants. This process is called tipping, and is an effective way to get new plants. Alas, I do not have space for more plants, so I prune them out. If you want to keep them, just dig them up in the spring and transplant.
If you look closely, you’ll see the cane working its way into
the ground in two places, where roots will form to create new plants.
In researching how to grow black raspberries, I learned that pruning three to four inches off the tops would help increase lateral growth for more berry production. After pruning, the remaining in-ground canes should be three to four feet tall. I also learned that the plant is high in anthocyanins, antioxidants, and a plethora of other healthy stuff, and I could save those pruned-off tips to make into a tea. So I did. It was a delightful cup of tea.
To increase lateral growth, prune three to four inches off the top of the cane.
I prepared a delightful cup of black raspberry tea with the
pruned tops. The leaves could be dried for future cups of tea.
The lateral canes also made it easier to harvest the sweet berries.
Vines showing lateral canes, which make for an easy harvest.
A bountiful harvest of black raspberries.
Late January or February is an ideal time to prune out the spent canes. As mentioned earlier, three of these six canes had grown tall enough to fall over and begin the tipping process.
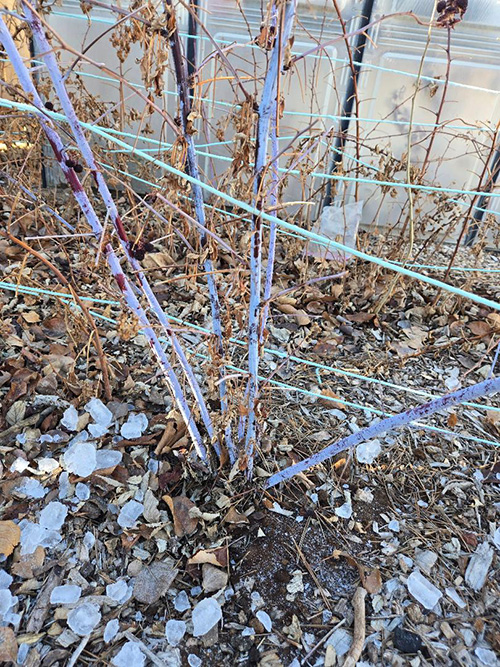
My black raspberry plant before pruning out some spent canes.
The white twine is there to support my Heritage raspberries.
If I let the black raspberries go wild, I’d need much taller supports.
I removed three canes, leaving the three strongest canes and cutting them down to about four feet tall. These will produce second-year growth as lateral branches, which will bear plenty of berries to enjoy later in the year. The canes will also sprout primocanes from their bases, continuing the fruiting cycle.
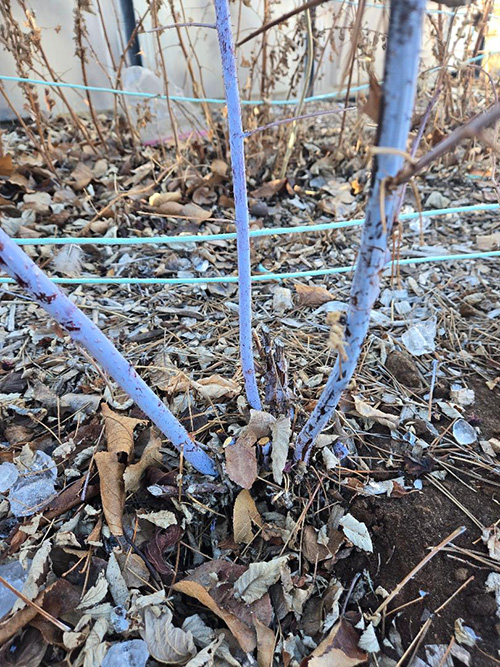
My black raspberry plant after pruning.
Master Gardener Photos
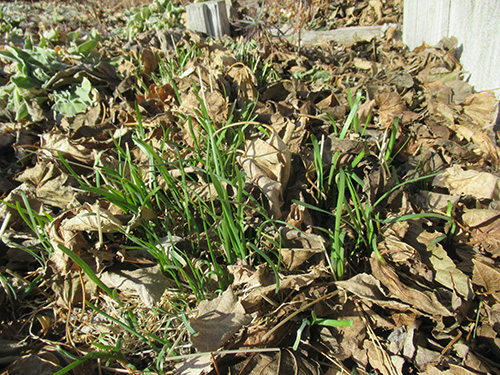
Allium tuberosa emerging from leaf mulch
by Becky Colwell

Daffodils popping up, a sure sign of spring
by Becky Colwell
Gratitude
We have so much to be thankful for. The University of Nevada, Reno Extension Master Gardener Volunteer Educator program is full of amazing volunteers who are committed to finding and providing scientifically based, university researched horticultural information for people in our community.
We could not do what we do without the help and support of our community, our University and Extension Partners and the amazing dedication of our Master Gardener Volunteers. Within our program we have some extra special volunteers known as Leads. They are the lead volunteers of various programs and activities. Leads are Master Gardeners that dedicate extra time to organize, plan, and execute tasks related to their project or activity. They do this by committing extra time to the program to lead and mentor other Master Gardener volunteers and give them the resources and confidence to support our community. They make a huge difference in our community as a whole and especially to the Master Gardener Program.
One such activity is the Master Gardener Greenhouse. Master Gardener Leads Cindy Edwards and Milan Slikkerveer step up to take on the enormous task of planning, scheduling, growing and distributing the plants we grow in our Master Gardener greenhouse. This is the largest funding source for your program as well as a huge element of what we contribute to our community. Let’s take a minute to get to know Cindy and Milan from a recent interview:
1. What sparked your interest in Gardening?
Milan- When I was 18, I got into houseplants. Later, when I moved to Tahoe, I continued to enjoy houseplants and then learned how to garden in a really cold zone. I also learned there is no nutrients in the soil here! I shoveled a lot of manure that first year.
Cindy – It’s been life-long. I had two great uncles in the agricultural business. One uncle had a neighborhood nursery and had been an estate gardener prior to opening his nursery. The other uncle had a chicken business. He had beautiful gardens around the farmhouse and huge vegetable gardens. I loved wandering through the gardens.
2. What is your gardening passion?
Milan – Landscaping. I enjoy taking something from nothing and turning it into something spectacular.
Cindy – I really like flowers in general. Even before I became a Master Gardner I had a little vegetable garden but if I had to choose, I’d choose flowers.
3. How has the Master Gardener Program scientifically helped you in your garden?
Milan – It has taught me to learn the scientific names of plants. The first scientific name I learned was when I went to a nursery and that name was Aquilegia (Columbine).
Cindy – Understanding seeding and propagation.
4. What makes you smile about the Master Gardener Program?
Milan – Plants make me smile. Also, walking away from a potluck or a class and gaining knowledge I didn’t know. One more thing to add to my brain!
Cindy – Oh My Gosh! Walking out in the garden in the early morning and seeing the hummingbirds and butterflies.
5. Share a meaningful Master Gardener volunteer experience.
Milan – That would be working at Rancho San Rafael Community Gardens and weeding. In the beginning this project was a weed-driven field and it has turned into a spectacular community garden. It’s taken multiple years to get there. It says a lot about what you can do with the land if you put your heart and soul into it.
Cindy – I would have to say it’s working at the Old Huffaker School gardens. When we are there on Thursday it’s rare that someone doesn’t stop by and thank us.
6. One word to describe the Maste Gardener Program?
Milan – Exciting
Cindy - Community
7. Describe your project
Milan – Volunteering at the Master Gardener Greenhouse. Growing a seed into a seedling and then watching it prosper and become either a vegetable or a plant we can share with the community and other Master Gardeners. We work from start to finish and have the satisfaction of knowing we did it!
Cindy – I am one of the Leads for the UNR Extension greenhouse. We normally start seeding in February or March and then potting up the seedlings. There is a lot of watering and then getting things ready for the sale which culminates the day of the sale. There is a lot that goes on in the background. This year we developed a tracking system which has helped improve the program. There is a lot of menial grunt work in the beginning but it’s important to keep your eye on the end result.
8. What is your vision for your project?
Milan – To work and grow plants in the greenhouse year-round and possibly have more than one plant sale per year to support our program.
Cindy – To improve on what we plant based on the results of the sale. Were there too many tomatoes? Too few tomatoes? Hopefully we will have more diversity of plants next year. Factors which influence our outcomes are the size of the space we are allotted, weather, water availability and the consistency of other volunteers.
9. How will you put that vision into place?
Milan – This year we are growing Fall crops, and we are propagating house plants, splitting and transplanting houseplants. We are moving on to sedums in the next week or two and will learn to divide and propagate those types of plants.
Cindy – Planning. Following through with the plan and using our new tracking system.
10. How does your project benefit the community?
Milan – We grow vegetables and flowers for the community and we support the volunteer projects throughout our community with the plants from our greenhouse. (Groups we help include Soulful seeds, Northern Nevada State Veterans Home, Ronald McDonald House and the Old Huffaker School).
Cindy – We offer beautiful healthy plants for sale and what doesn’t sell goes to various projects for the public to enjoy. Ex: Northern Nevada State Veterans Home, Old Huffaker School Garden and Rancho San Rafael community gardens. We can grow pre-specified plants to help these groups if we know soon enough what they’d like. We’ve given things to Soulful Seeds, which also benefits groups in the community. Our Sale funds the greenhouse and many of the Master Gardener programs.
11. What keeps you involved in the Master Gardener Program?
Milan – Gardening is my passion
Cindy – It’s a passion. All the wonderful people I work with and seeing the results of my efforts.
12. What little known fact about your project would you like others to know that they likely do not?
Milan – A little know fact is that we are a team, we laugh, we have fun, we learn, and we get to spend quality time watching our plants grow.
Cindy – How important it is to have a core group that is dedicated to your project. You can’t be successful without the core group. While short-term help is appreciated, the core group of consistent volunteers is essential.
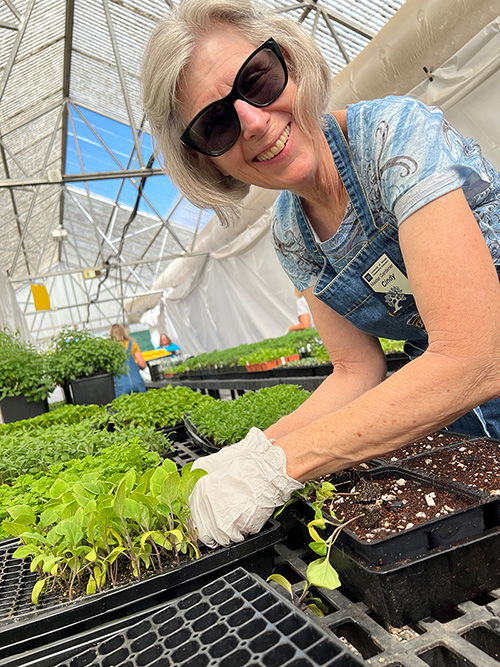
Cindy at the greenhouse.
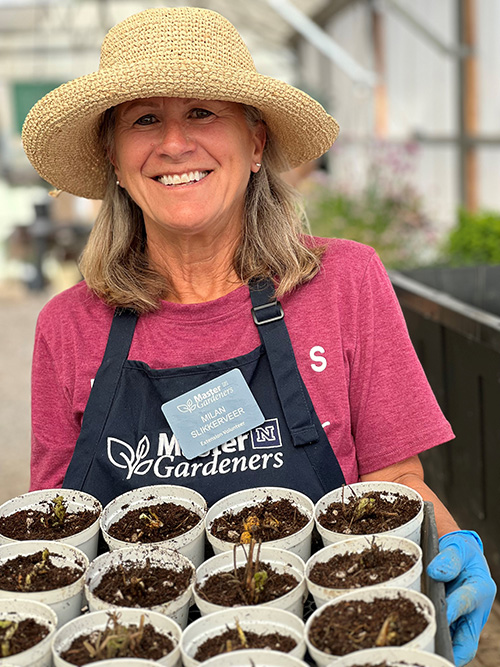
Milan at the greenhouse.
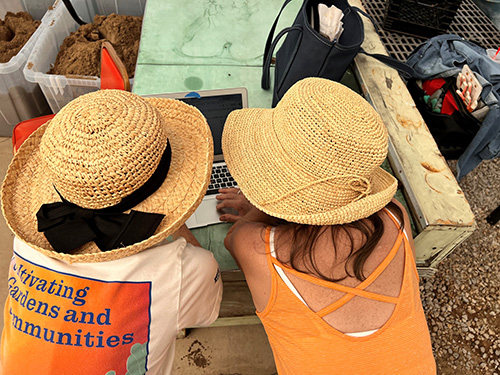
Strategizing at the greenhous.
Questions or comments?
Reach out to us!
Help Desk Hours: 10 a.m. - 2 p.m. Tuesdays, Wednesdays & Thursdays
Phone: 775-784-4848
Email: ExtensionWashoeMG@unr.edu
Rachel McClure Master Gardener Coordinator
Phone: 775-336-0274
Email: rmcclure@unr.edu
How to become a Master Gardener
WASHOE COUNTY MASTER GARDENER EVENTS
MASTER GARDENER HELP DESK
Published by:
McClure, R., Colwell, B., Doolittle, C., 2025, Washoe County Master Gardener Newsletter (2025-03), Extension, University of Nevada, Reno, Newsletters
An EEO/AA Institution. Copyright © 2026, University of Nevada Cooperative Extension.
A partnership of Nevada counties; University of Nevada, Reno; and the U.S. Department of Agriculture