In this edition
- A Note From the Editors
- 2024 Was a Great Year!
- How to Help Our Insect Friends
- Moon Garden Basics
- What's Cooking in My Garden?
- Stop! Before you buy that plant... Where Will You Put It?
- Talking Tomatoes From Seed
- The Results are In: Master Gardener Tomato-Growing Contest.
- Winter Water for Birds
- Planting Seeds Indoors
- Dreaming of Your Own Backyard Greenhouse?
- It's Coming Up Roses
- Gratitude
- Master Gardener Photos
About This Newsletter
Welcome to our newsletter dedicated to gardening enthusiasts in Nevada! Here, the Master Gardener Volunteers of Washoe County are committed to fostering a community of gardening knowledge and education. Through this publication, we aim to provide research-based horticulture insights for our readers. Each quarter, we offer a wealth of information covering various aspects of gardening, from upcoming garden events to advice on topics ranging from pest control to sustainable gardening practices. Join us as we explore the science and artistry of gardening together!
A Note From the Editors
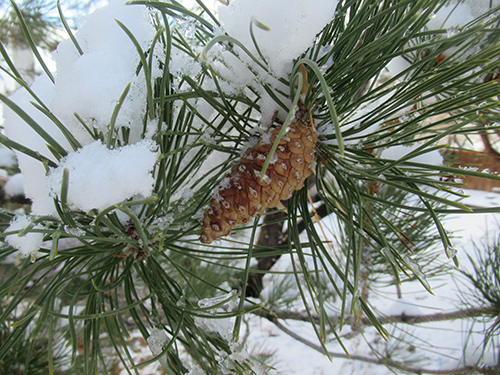
Austrian pine tree cone with a nice covering of snow.
Photo by Becky Colwell
Another gardening year is coming to a close. Winter is the perfect time to reflect on the year past and start planning for the next. Maybe adding an herb garden, new varieties of vegetables, or more flowers for the beneficial insects. There are also cold-weather garden chores to be done, like servicing lawn mowers, sharpening and cleaning pruning tools, and cleaning out gardening sheds and greenhouses. To kill any insect eggs and disease spores, soak empty pots and containers for a couple of hours in a bucket filled with warm water, a squirt of bleach-free dish soap, and a cup of white vinegar. Then scrub with a cloth or sponge.
To prevent root damage from winter drying, especially in evergreens and newly planted trees, water your trees and shrubs monthly in the absence of precipitation. Wait for a day that has temperatures above 40 degrees and apply water midday so it will have a chance to sink in before possible night freezing. Allow the water to soak the soil slowly to a depth of 12 inches. A general survival rule, according to the Colorado State University Extension, is to apply 10 gallons of water monthly for every inch of a tree’s diameter. Shrubs less than three feet tall need five gallons monthly. Shrubs more than six feet tall require 18 gallons monthly.
Enjoy your winter interlude,
Becky & Chris
2024 Was a Great Year!
The Extension Washoe County Master Gardener Volunteer Educators achieved some amazing things in 2004. They helped many people and made the community we live and play in a better place. I am so fortunate to be able to spend so much of my time with these people. The year is not over, and all our reporting is not in but we are making strides.
| 2024 Continuing Education Hours |
2023 Continuing Education Hours |
2022 Continuing Education Hours |
| 1,450.50 hours |
1,348.75 hours |
1,140.25 hours |
| 2024 Volunteer Hours |
2023 Volunteer Hours |
2022 Volunteer Hours |
|
|
|
|
Staying current with horticultural practices and information is crucial to the Master Gardener Volunteer Educator role and our Master Gardeners are putting more effort in this area to ensure we can help our community. Our volunteers have also continued to increase their impact in our community with more educational and hands-on activities, volunteering over 5,000 hours to Washoe County and its community members.
- Northern Nevada Veterans Homes
- Master Gardener Teaching and Demonstration Garden at Rancho San Rafael
- Ronald McDonald House
- Spanish Springs Library Talks
- Home Show
- Garden Tour
- Junior Master Gardener Program, South Valleys Library
- Seed Swap
- Third Thursday Talks, Rancho San Rafael Community Garden
- Gardening in Nevada: The Bartley Ranch Series
- Greenhouse, UNR Agricultural Experiment Station
- UNR Native & Pollinator Gardens
- Food Sovereignty Garden
- Help Desk
- Mobile Help Desk
- Historic Huffaker School
- ...And many more
These people and their passion in combination with the University of Nevada, Reno Extension, are an amazing force.
Thank you, Washoe County Master Gardeners, for all that you do!
How to Help Our Insect Friends
Photos & article by Becky Colwell
There are almost one million described insect species on Earth. Fortunately for mankind, 99 percent are our friends, serving in many beneficial roles such as food for birds, reptiles, and mammals; pollinating crops and other plants, eating pest insects, and churning our soil. Alas, our insect friends are being threatened by habitat loss, pesticides, and climate change. According to the Union for Conservation of Nature (IUCN), 40 percent of beneficial insects are considered threatened worldwide.
We can help them by making high-quality habitats in our yards and avoiding the use of pesticides, especially insecticides. These back-yard habitats can provide life-sustaining islands as well as travel corridors and “stepping stone” habitats to help insects move across the landscape in search of new habitats. Let’s take a look at how you can make an insect-friendly habitat by incorporating their basic survival needs of food, nesting, and overwintering sites into your garden ecosystem.
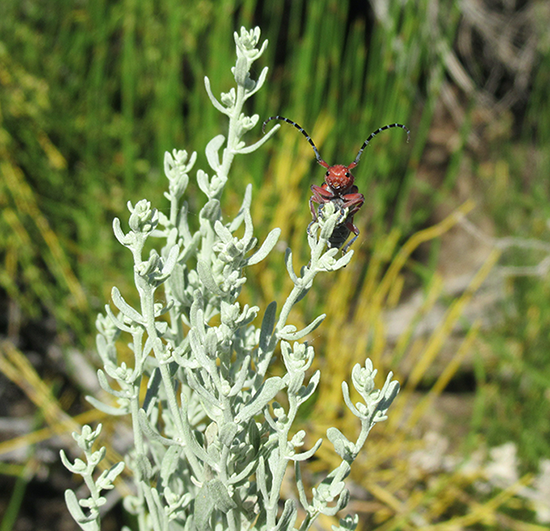
Red milkweed longhorn beetle, host plant is Asclepias spp. (milkweed),
resting on Artemisia tridentata (big sagebrush). Birds are their predators.
Imagine if you had food available only sporadically or not at all. This is currently a reality for our insect pollinators and could become a reality for humans as fewer insects available to pollinate our food crops translates to less available food. As gardeners we can help by providing food sources for our insect friends. Pollinators and some other adult beneficial insects need flowers for their nectar and pollen, while the young of beneficial insects need pest insects to eat. Some beneficial insects, such as wasps, provide dead insects in their nest for their young to eat, others, called parasitoids, lay their eggs on or in live pest insects. When the eggs hatch, the young eat their host. Providing food in a healthy garden ecosystem means leaving pests for the beneficials and planting a variety of blooming plants.
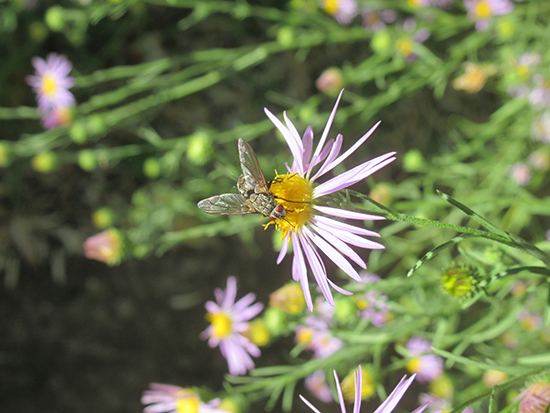
Adult tachinid fly enjoying nectar from an aster. Tachinid flies are parasitoids
who lay their eggs on or in many host insects such as caterpillars and the nymphs
of earwigs, grasshoppers, and sawflies. When the eggs hatch, the young eat the host.
As you are planning for next year, think about the availability of blooms your garden provides from April through October. Many of us landscape for decorative purposes rather than to meet the needs of insects. Consider these important needs as you start to develop the food portion of your healthy garden ecosystem.
- When possible, choose native plants as they share a long evolutionary history with our native pollinators. Plus natives require less water, no fertilizer, and are adapted to our poor soils.
- This link lists native plants for pollinators and beneficial insects for the Great Basin
- Avoid modern hybrids as they have been manipulated for larger, showier blooms and may have lost their ability to produce nectar and pollen. Choose older heirloom varieties known to produce nectar and pollen.
- Check to make sure the plants have not been systemically treated with neonicotinoids, an insecticide harmful to our pollinators and beneficials.
- Think diversity by providing a three-season bloom with a variety of flower shapes and sizes to attract a diversity of pollinators.
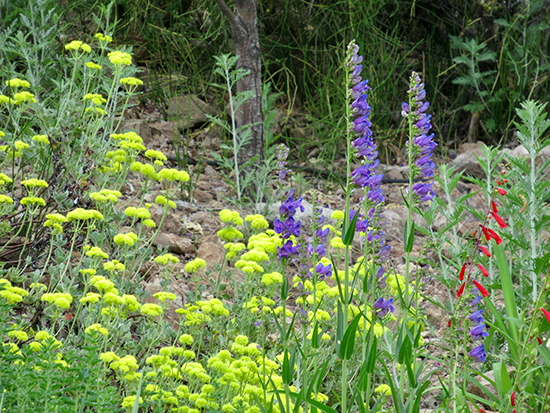
An example of flowers with different shapes and sizes. The umbel-shaped yellow flowers are on the native Eriogonum umbellatum (sulfur-flower buckwheat), which attracts many bees, butterflies, and beneficial insects. The blue bell-shaped flowers belong to the native Penstemon strictus (Rocky Mountain penstemon). The red bell-shaped flowers belong to the native Penstemon eatonii (firecracker penstemon). Penstemon spp. are another great choice for pollinator food.
Here are a few perennial plants to consider adding to your garden. Choose varieties having different bloom times to provide food through all three seasons.
- Monarda fistulosa (bee balm).
- Asclepias spp. (milkweed)
- Coreopsis spp.
- Salvia spp.
- Lavendula spp.
- Penstemon spp.
- Astilbe spp.
- Dianthus spp.
- Allium spp.
- Perovskia (Russian sage)
- Cosmos spp.
- Zinnia spp.
- Achillea millifolium (common yarrow)
Herbs: Ocimum basilicum (basil), Anethum graveolens (dill), Foeniculum vulgare (fennel), Petroselinum crispum (parsley), Mentha spicata (spearmint) and Origanum spp. (oregano).
- Helianthus spp. (sunflower)
- Viola spp. (violets)
- Gaillardia spp. (blanket flower)
- Rudbeckia hirta (black-eyed susan)
- Symphyotrichum spp. (asters)
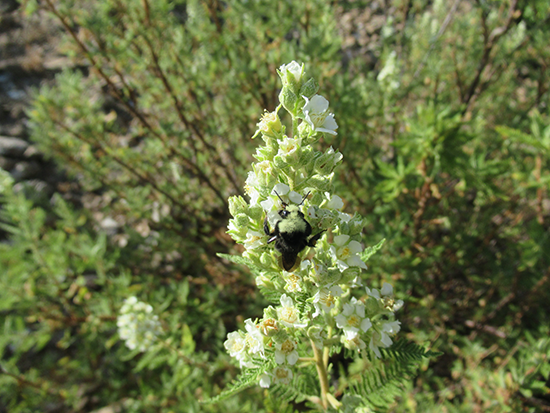
Shrubs are also a good addition to landscape. These are the flowers of the native shrub Chamaebatiaria
millefolium (fernbush). Blooming in July, the flowers provide food for our pollinators and specialist bees.
Here you see a bumble bee visiting the flowers.
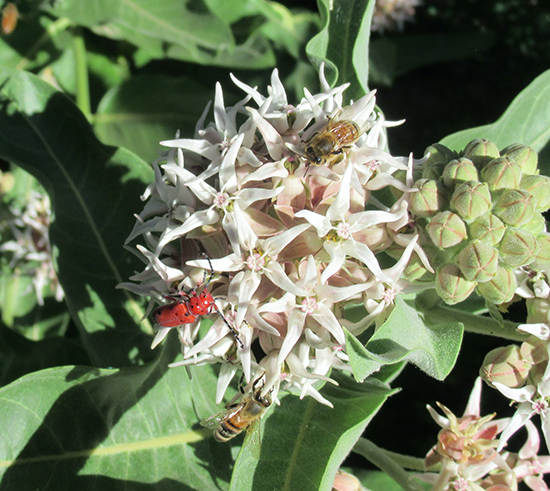
Asclepias speciosa (showy milkweed) flowers attract many of our insect friends. It is one of the host plants,
in our area, for the monarch butterfly. Honey bees and the red milkweed longhorn beetle are visiting this flower.
Overwintering sites protect insects from cold winter temperatures. Insects are poikilotherms, or cold-blooded. This means they cannot internally regulate their body temperature, but instead must maintain a constant temperature by basking or burrowing. Insects do not develop or function at temperatures below 50 degrees F. Depending on the insect, there are many developmental stages in which they overwinter: larvae, nymphs, eggs, pupae, or adults. By providing a variety of microhabitats you are sure to meet all their needs.
- Leave a deep layer of leaves in your flower beds or other lawn-free areas.
- Provide logs or brush piles from your pruning.
- Rocks and ground-cover also provide protection from the cold.
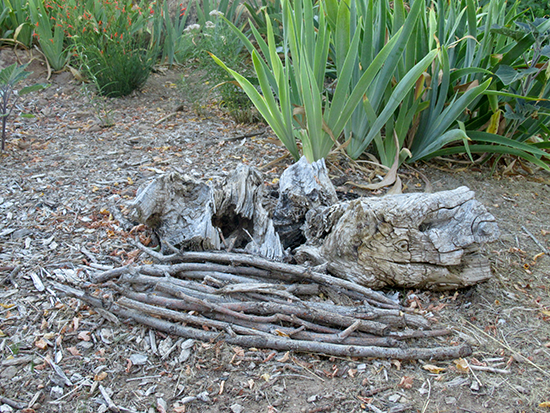
Providing overwintering sites can be as simple as providing small
logs and a pile of limbs from pruning to offer protection from the cold.
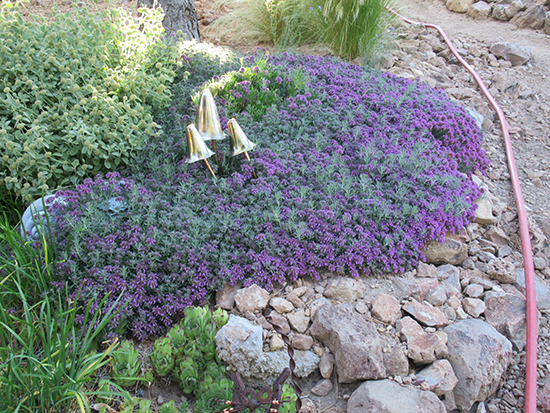
Ground covers offer protection in the winter as well as nectar
and pollen sources in the summer. Pictured is Teucrium aroanium
(gray creeping germander). The rock border provides more overwintering hiding places.
Nesting sites are essential for the survival of the species. Most insects have a very short life span as adults. Depending on the species, there can be one or more generations per season. Many adult butterfly species live for just two to four weeks, ladybugs a few months, and native bees three to eight weeks. Since insects are on their own from egg to adult, the female spends her adult life making and provisioning her nest so the young have food when they hatch. Others lay their eggs on or in a live host pest. Our ground-nesting native bee species forage only a very short distance from their nests, perhaps a few hundred yards, so having nesting sites close to their food source is very important.
- 70 percent of native bees nest underground in sunny, well-drained, bare sites.
- 30 percent of native bees nest in hollow plant stems like those found in asters, bee balm, milkweed, and sunflowers, or in holes in wood. Avoid cutting these plant stems back until late spring, when temperatures are consistently above 50 degrees F.
- Parasitic beneficial insects lay their eggs on or in numerous pest species as well as butterfly or moth caterpillars. When the eggs hatch, they eat their live host.
- Predatory insects, such as lady beetles and lacewings, lay their eggs near live pest insects such as aphids. They begin eating these pests upon hatching.
- Other predatory insects, such as ambush bugs, assassin bugs, and minute pirate bugs, lay their eggs on flower leaves or stems or insert eggs into plant tissue.
- Butterflies need specific host or food plants. Upon hatching, the caterpillars will eat the leaves of the host plant before becoming a chrysalis. Carefully examine a plant that shows evidence of chewed leaves; chances are it is being eaten by a butterfly or moth caterpillar. These host plants have evolved so that losing some leaves will not kill them or stunt their growth.
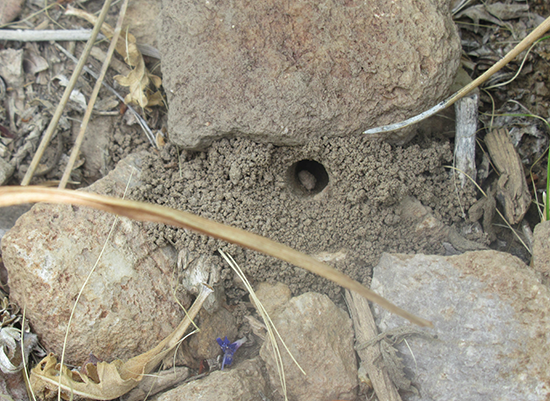
A ground-nesting bee’s nest. The female uses her mandibles to dig a tunnel underground in bare
soil free of mulch and weed barrier fabric. The adult female spends her lifespan of three to eight
weeks digging her nest, then provisioning it with pollen and nectar, before finally laying her eggs.
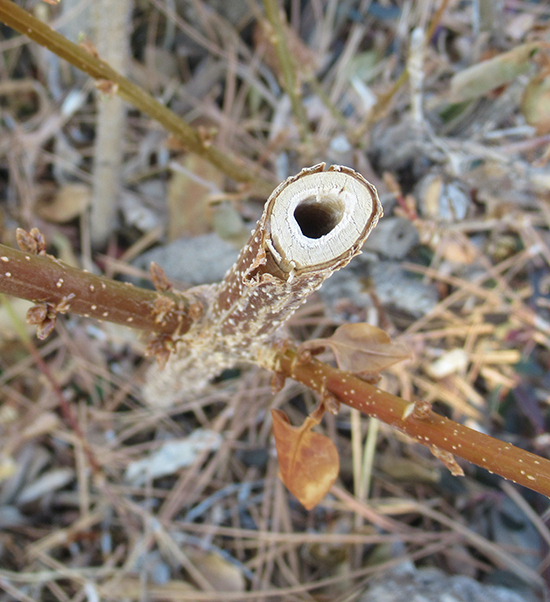
The hollow stem of a forsythia makes a good nesting site for stem-nesting native bees.
Host plants for a few of our common area butterflies:
- Monarch - Asclepias speciosa (showy milkweed) and Asclepias fascilaris (narrow-leaf milkweed).
- Western tiger swallowtail - trees: cottonwood, alder, ash aspen, willow.
- Two-tailed swallowtail - chokecherry, ash and hoptree.
- Western fritillaries - violets.
- American lady - ironweed, pearly everlasting, pussy toes.
- Cabbage white - Brussel sprouts, collard, mustard plant.
- Painted lady - hollyhock, legumes, thistle, mallow.
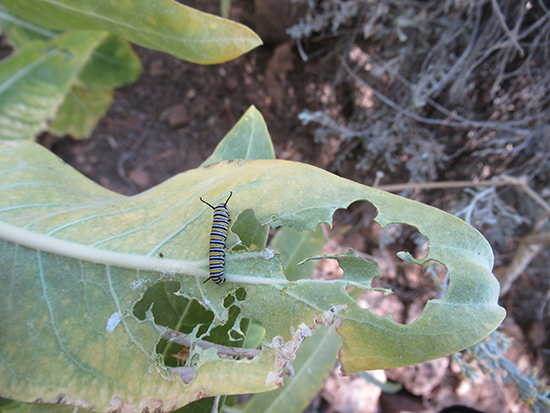
A monarch caterpillar eating the leaf of its host plant Asclepia speciosa (showy milkweed).
Insects are resilient. By turning our yards into life-sustaining islands and corridors we can help them rebuild healthy populations.
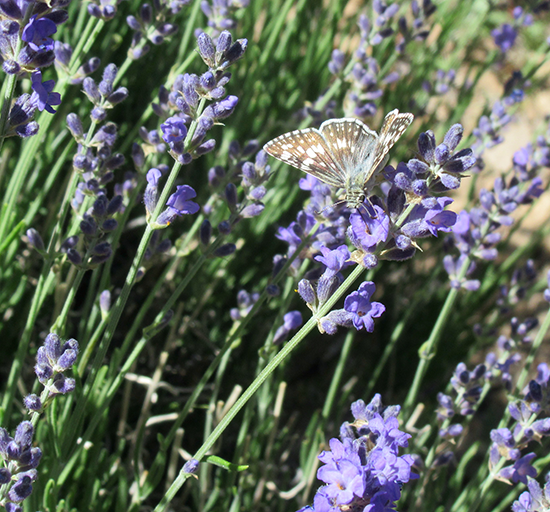
A common checkered-skipper enjoying the nectar of a Lavendula spp. (lavender).
Host plant for these butterflies is the native desert globemallow (Sphaeralcea ambigua).
References:
- Forister, Matthew L.; Pelton,Emma M.; Black, Scott H.; “Declines in insect abundance and diversity: We know enough to act now,” Conservation Science and Practice, a journal of the Society for Conservation Biology, June 22, 2019.
- Janicki, Julia; Dickie, Gloria; Scarr, Simon; and Chowdhury, Jitesh: “The Collapse of Insects,” Reuters, Dec. 6, 2022.
- Code, Aimee; and Hoyle, Sarah; “Better Pest Management: Protecting Pollinators at Home,” Xerces Society.
- Brock, Jim P.; Kaufman, Kenn; “Kaufman Field Guide to Butterflies of North America,” Houghton Mifflin Company
Moon Garden Basics
Article by Victoria Gutierrez
As we put our gardens to bed for the winter, and cooler weather slowly descends, many of us are already dreaming of gardens for next year. Anyone looking for something a little different might want to consider a moon garden, also called a moonlight garden. The very name elicits thoughts of something dreamy and almost magical. Because a moon garden is limited only by the gardener’s imagination, there is no reason for it to be anything less.
A moon garden is a space specifically planned to be enjoyed at night. As such, there are a few considerations that help to make it a success. One of the goals is to include something pleasing for all the senses. The two primary elements to address are light and color.
Light is essential for a moon garden. Preferably, the garden will be set in an open area, to get as much moonlight as possible. Other light sources can supplement or highlight specific elements, like a special plant or statuary. Consider solar lights, low-voltage lights, or even battery-operated candles in pretty lanterns.
Color is equally important, and light colors show up better at night. Dark colors tend to recede. A moon garden should include plant life with light or silvery leaves and flowers in white or pale shades. Keep color in mind when selecting hardscapes and decor, too. A dark statue will get lost, whereas a light-colored one can be a real showstopper. A pretty bench is a nice addition that can add comfort to the space.
Plants with variegated leaves are welcome in the mix, because their white borders or striations stand out at night. Multicolored caladiums (C. x hortulanum), variegated hostas (Hosta undulata variegata), and variegated pineapple mint (Mentha suaveolens variegata) are all good candidates.
A bonus for moon gardens is that some flowers are much more fragrant at night to attract pollinators. A few flowering plants to consider are sweet rocket (Hesperis matronalis), lavender (Lavendula angustifolia), zonal geraniums (Pelargonium zonale), sweet alyssum (Lobularia maritima), and of course roses (Rosaceae).
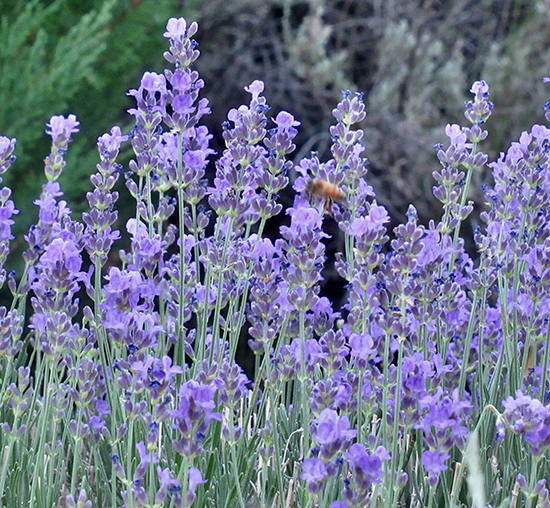
Lavender (Lavandula spp.) has pale gray foliage and a soothing scent, both welcome in a moon garden.
Photo by Becky Colwell
Some plants might be included for both texture and scent. Consider plants like sage (Salvia officianalis) with its velvety texture and warming scent, or lamb’s ear (Stachys byzantina) with its soft, silvery leaves. Tall grasses that dance in the breeze add another layer to the composition.
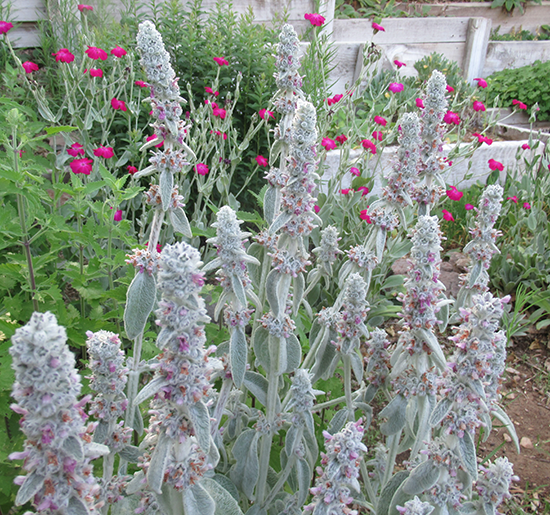
Lamb’s ear (Stachys byzantina) forms a low-growing dense mat of soft, silver foliage that gleams in the moonlight.
Photo by Becky Colwell
Finally, other elements to think about are sound, fragrance, and touch. The melodic notes of a wind chime, a trickling fountain, the heady scent of honeysuckle, and a comfy chair next to a feathery fern can indeed make a magical and inviting space.
What's Cooking in My Garden?
Photos and article by Beth Heggeness
As long as I can, before a truly hard frost, I clip fresh herbs from the established plants in my outdoor culinary herb garden. Yes, those home-grown herbs may be dried or preserved, but my taste runs to fresh. So at some point, I need to think about growing what I need indoors.
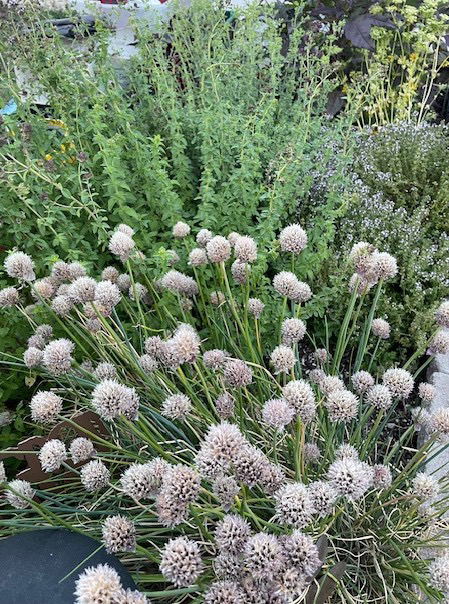
Beth’s raised bed outdoor herb garden.
I, an inveterate home cook, love to make meals “from scratch” as my grandma used to say, every day of the week. Any veteran home cook or chef might say the secret to the tastiest food is fresh culinary herbs.
The fresh herbs available at the grocery store are an expensive luxury purchase. I’m only willing to buy whatever I can’t possibly find in the garden, or don’t have on hand for very special holiday meals. But many culinary herbs can be grown in pots in a sunny spot in your home, or perhaps in a small hydroponic growing unit.
Growing herbs from seed indoors means planning ahead. In some cases, you may need to chill the seeds before sowing them (consult the seed packet). Most herbs germinate in two to four weeks, and will need another four to six weeks to grow big enough to use. As seen in the illustration, basil is the fastest grower. (It’s ready to prune for spaghetti and meatballs!) Another option is to buy a fully grown herb plant from a nursery. Some grocery stores also offer mixed herb plants in pots, or you can even pot the rooted “living herbs,” like basil, that some grocers sell in plastic sleeves. As fresh herbs for a single purpose, they’re pricey, but as plants that can produce all winter, they’re very reasonable!
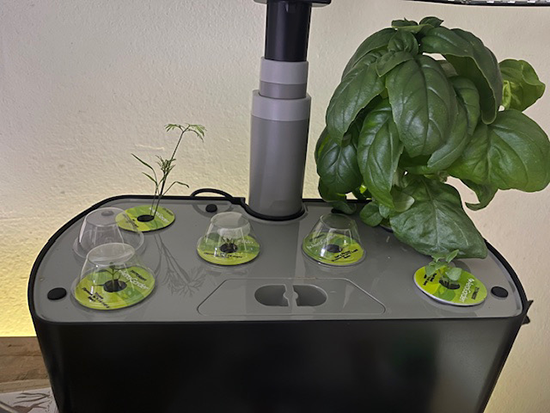
Herb seedlings in an indoor hydroponic garden. This unit is from AeroGarden,
which is no longer in business, but other brands are available online.
Fresh herbs are especially tasty in the cold season, adding earthy, comforting flavors to your salads or soups, or to roasted root vegetables, meats, and stews.
You can add the taste of spring by chopping and sprinkling a fresh garnish of herbs to your dishes, or make a pesto or chimichurri sauce. Easiest of all, try a vinaigrette.
Homemade vinaigrette, for salads or marinades, is quick and very easy. Why pay extra for salad dressings, marinade packets (with preservatives, more sodium than needed, etc.) when the ingredients to mix it up yourself are so easy to keep on hand, and can be prepared in not much more time than opening and pouring a premade packet?
Most recipes for vinaigrettes generally use a 2:1 ratio of oil to acid (two parts oil to one part acidic liquid such as lemon or lime juice or almost any kind of vinegar – red, white, rice, wine, balsamic). For a single serving, two tablespoons of oil to one tablespoon of vinegar is standard.
I prefer a 1:1 or 1.5:1 ratio because I like the bright taste of the acidic liquid. But you can adjust the ratio to your liking. Add salt and pepper to your taste, and voila! That’s all a basic vinaigrette needs. In many Mediterranean countries, it’s common to put a bottle of olive oil and a bottle of wine vinegar on the table, ready for diners to top their salads to their own taste.
But you can mix in finely chopped garlic and fresh herbs such as chives, thyme, and oregano. Or add a bit of sweetener (like honey or agave syrup), or mustard, or garlic or onion powder – whatever suits your taste. Shake the dressing just before using it to suspend the herbs in the emulsified oil and acid.
Start small if this is a new cooking experience for you. If you mix a tablespoon of olive oil and a tablespoon of vinegar and say bleah! so what? You’ve not lost much. If you mix up just enough for the day’s meal, you’ve saved money and gained experience.
Beth’s Basic 1:1 Vinaigrette for a Green Salad
4 servings
8 cups of mixed leafy salad greens. (like lettuces, spinach, arugula, chopped kale)
3 tbsp. oil (extra virgin olive oil, avocado oil, nut oils)
3 tbsp. vinegar or fresh acidic juices such as lemon, lime, orange.
¼ tsp. Dijon mustard
¼ tsp. agave syrup
Salt and pepper to taste
1 tbsp. freshly chopped herbs (chives, parsley, thyme, oregano, rosemary, lemon thyme, etc.)
Whisk or shake together in a small jar and chill. Shake again just before serving on greens.
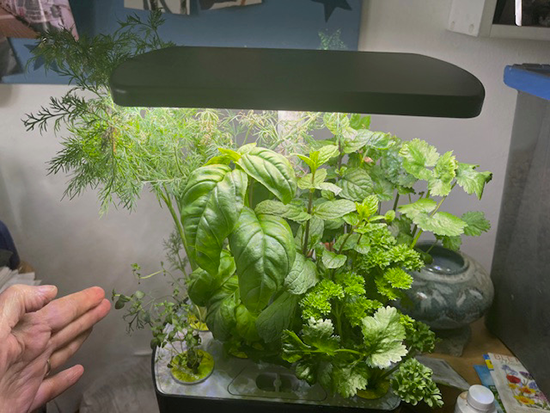
Fully grown indoor hydroponic herbs; dill,
Thai basil, basil, mint, parsley, cilantro, thyme.
RESOURCES:
- “Start Herb Seeds Indoors,” Kreith, Nancy; Illinois Extension; 2020. https://extension.illinois.edu/news-releases/start-herb-seeds-indoors
- “Growing Herbs Indoors,” Sanchez, Elsa; Penn State Extension; 2023. https://extension.psu.edu/growing-herbs-indoors
- “Hydroponics: A Brief Guide to Growing Food Without Soil,” Treftz, C; Kratsch, H; and Omaye, S. University of Nevada, Reno, Extension, 2015. https://extension.unr.edu/publication.aspx?Pubtitle=2756
STOP! Before You Buy That Plant . . . Where Will You Put It?
Charts and article by Diane Miniel
It’s May in Northern Nevada and I’m in PLANT mode. I stop at Costco to purchase our normal supplies, and I see them: four kinds of berry bushes for less than $15. What a deal! They fall into my cart and make their way to my home, where they sit in my kitchen sink for a few weeks as I don’t know where to plant them. Unfortunately, three of the four die. Not such a deal after all.
If this is your experience, I beseech you to STOP! Don’t buy a plant on impulse. Take a picture of it or write down its name, both common and scientific.
You’ll need to consider a few things before purchasing a plant for your garden.
- Does the plant fit into your garden plan?
- What are the plant’s needs?
- Does your yard meet the plant’s needs?
Your Plan
First, you’ll need to consider whether the plant fits into your garden plan.
Unfortunately, I didn’t have a plan. I had garden inspiration. The idea of creating a formal plan seemed insurmountable. I had a hazy thought of a vegetable garden in the backyard and a flower garden in the front yard. My newly purchased blueberry and elderberry bushes presented me with a dilemma: I could envision them planted in my backyard as well as my front yard. So, even though they didn’t fit my “plan,” I bought them anyway.
At that time, I didn’t know a lot about what my backyard and front yard could grow. The basic things I needed to consider were the hardiness zone, how much sunlight it got, the kind of soil my garden had, and any regional problems such as the high winds in Northern Nevada.
Figure 1: Basic Plant Purchase Check List
| Good Purchase |
Not a Good Purchase |
Basic Requirements |
| |
|
1. The plant fits into my garden plan. |
| |
|
2. The plant can thrive in my hardiness zone. |
| |
|
3. My yard provides the plant enough sunlight/shade. |
| |
|
4. My yard/container can provide the plant's soil requirement. |
| |
|
5. My regional problem (wind) can be addressed. |
Hardiness Zone
The first step in clarifying your gardening plan is knowing which Hardiness/Heat zone you live in. The USDA has an online chart of the United States categorized into 13 temperature zones at https://planthardiness.ars.usda.gov/ .
Note: The zone chart has a 10-degree Fahrenheit difference between the zones. Each zone is then further subdivided into 5-degree differences, 7a and 7b for example. The “b” zone is slightly warmer than the “a” zone.
My Northern Nevada hardiness zone is 7a.
While most nursery or big-box store plants will be labeled with basic plant information, requirements can also be found online. According to their packaging, the blueberry could thrive in zones 4-8, and elderberry bushes could thrive in zones 3-9.
Sun: Full Sun, Partial Sun, Partial Shade, Full Shade
Because all plants need some amount of sun to grow, the next thing I needed to know was what kind of sunlight my yard gets: full or partial sun, shade, or partial shade.
Figure 2: Sunlight and Shade Definitions
| Sun or Shade |
Hours of Sunlight |
| Full |
6+ |
| Partial sun |
4 to 6 hours |
| Partial shade |
2 to 4 |
| Shade |
2 or less |
(Source: Hubbard)
My southeast-facing front yard gets more sunlight than my northeast-facing backyard, especially in the summer. My backyard faces northeast and receives more sun in the summer. However, my front yard is home to a large ornamental pear tree that provides a lot of shade in the summer. In front of the pear tree next to the sidewalk is a small area that receives full sun. But I had envisioned planting both berry bushes on the side of my front yard as a hedge between my neighbor’s yard and mine, not as a hedge between my house and the sidewalk. In addition, my neighbor also has a large pear tree which also provides both our yards with a lot of shade in the spring, summer, and fall.
While the elderberry might have thrived, the blueberries probably would not. Thus, the berry bushes were not a good match for my front or backyard due to the limited amount of area that received full sunlight.
Soil
Another basic factor I needed to know was whether the soil in my yards drained well or not. The blueberry bushes require well-drained soil.
The best practice is to have the soil(s) in your yards tested by a soils lab. The test results would reveal not just the type of soil (sand, clay, loam), but also the pH and macro and micronutrient mineral composition.
Figure 3: DIY Soil Test
| Step |
Instructions |
Result |
| 1. |
Dig a 6-inch-deep hole |
|
| 2. |
Fill the hole with water. |
|
| 3. |
If the water level remains about the same after one hour... |
Drainage is poor. (clay)
|
| 4. |
If the water drains from the hole after one hour... |
The soil does not hold water. (sand) |
(Source: Hillock et. al., Nov. 2020)
I performed the DIY drainage test on my backyard soil. After an hour, the water level in the six-inch hole had not diminished much. Thus, my backyard was mostly clay and not well drained.
Yet another reason why I should not have purchased the berry bushes.
Of course, you can amend the soil in your yard by purchasing the kind of soil the plant requires, digging an appropriately sized hole, and mixing the soil in. Many plants also do well in containers filled with the required kind of soil.
Figure 4: Soil Drainage & Nutrients
| Soil Type |
Instructions |
Result |
| Sandy |
Drains quickly |
Low nutrients |
| Clay |
Drains slowly |
High nutrients |
| Loamy |
Ideal soil for water-holding capacity |
Retains nutrients |
(Source: Hubbard, 2023)
Figure 5: pH
Soil pH measures how alkaline or acidic the soil is, ranging from 0 to 14.
| pH |
Acidic/Alkaline |
| Less than 7 |
acidic |
| Greater than 7 |
alkaline |
| 7 pH |
neutral |
| 6.5 to 7.5 pH |
Usually ideal |
(Source: Hillock et. al., Nov. 2020)
Note: Blueberry bushes require acidic soil, which is not typical in Northern Nevada.
Figure 6: Chemicals Plants Need to Grow
Primary
Macronutrients |
Secondary
Macronutrients |
Micronutrients |
| Carbon |
Calcium |
Molybdenum |
| Hydrogen |
Magnesium |
Manganese |
| Oxygen |
Sulfur |
Copper |
| Nitrogen |
|
Chlorine |
| Phosphorus |
|
Boron |
| Potassium |
|
Iron |
| |
|
Zinc |
(Source: Hillock et. al., Nov. 2020)
Regional Issues:
Northern Nevada experiences high winds, especially where I live. Wind direction and velocity forecasts for your area can be found online.[4] For example, as of the writing of this article, northern winds were 1 – 10 mph.
Wind direction and velocity would affect what I plant in my backyard more because my house provides some shielding from winds in my front yard. While my backyard has a cement fence, I could improve the wind barrier by including trees and shrubs in my backyard garden plan, though it would take a few years of growth for the plants to become sufficient wind barriers.
Figure 7: Completed Basic Plant Purchase Check List
| Good Purchase |
Not a Good Purchase |
Basic Requirements |
| |
X |
1. The plant fits into my garden plan. |
| X |
|
2. The plant can thrive in the hardiness zone. |
| |
X |
3. My yard provides the plant enough sunlight/shade. |
| |
X |
4. My yard can easily provide the plant's soil requirement. |
| |
X |
5. My regional problem (wind) can be addressed quickly. |
Other Factors
While the guidelines above will start you on your way toward successful plant selection and planting, there are many other considerations when planning your garden and purchasing the right plant for the best location in it. Some factors to consider are the amount of space the plant will need when fully grown; the best time to put the plant in the ground; the best planting practices; how much water the plant requires; how you will provide that water; when the plant blooms; and what other companion plants can grow well with it.
Takeaway
Having a garden plan and knowing the basics of your hardiness zone, the amount of sunlight and type of soil required, plus any regional issues such as high winds will prevent you from the spontaneous purchase of a plant that may never have a place in your garden.
Resources
- Banks, Shawn; and Bradley, Lucy; “Vegetable Gardening: A Beginner’s Guide,” North Carolina State Extension Publication, Oct. 6, 2023, https://content.ces.ncsu.edu/home-vegetable-gardening-a-quick-reference-guide
- “Choosing the Right Location for Your Vegetable Garden,” Office of the Public Outreach and Communication, Rutgers University, April 7, 2020, https://sebsnjaesnews.rutgers.edu/2020/04/choosing-the-right-location-for-your-vegetable-garden/
- Hillock, David, “Healthy Garden Soils,” Oklahoma State University Extension, ID: HLA-6436, February 2014. https://extension.okstate.edu/fact-sheets/healthy-garden-soils.html
- Hillock, David; Mitchell, Shelley; Quetone Moss, Justin; Lockhard, Bailey; and Sharp, Pamela. “Basic Plant Care: Understanding Your Plant’s Needs,” Oklahoma State Extension, November 2020. https://extension.okstate.edu/fact-sheets/basic-plant-care-understanding-your-plants-needs.html
- Hoidal, Natalie. “Companion Planting in Home Gardens,” University of Minnesota Extension, Reviewed in 2021, https://extension.umn.edu/planting-and-growing-guides/companion-planting-home-gardens
- Hubbard, Pamela T. “Planting in Sun or Shade,” Penn State University Extension, July 5, 2023. https://extension.psu.edu/planting-in-sun-or-shade
- Wyatt, Gary. “Selecting Trees and Shrubs for Windbreaks,” University of Minnesota Extension, Reviewed in 2020, https://extension.umn.edu/agroforestry/trees-shrubs-windbreaks
Talking Tomatoes From Seed
Article by Beth Heggeness
Ahhh…the garden is put to bed. Daylight savings is done. The winter holidays are upon us. And the glossy, alluring seed catalogs may be rolling in, encouraging us to dream about a wonderful productive garden in 2025.
Raise your hand if the last gardening season in Northern Nevada was challenging. That’s me.
Raise your hand if anything might not have grown as expected wherever you live. That’s me, too. Every garden is a new experience. I’ve lived in Reno for 40+ years, and the gardening climate has changed.
I’m an urban tomato grower who had never started a tomato seed in my life before two years ago, not counting an occasional “garden volunteer” (usually a cherry tomato). The purpose of this article is to suggest varieties that grow well in Northern Nevada and share tips on starting seeds.
Seedlings of tried and true tomato varieties – ‘Early Girl,’ ‘Ace,’ and ‘Celebrity’ come to mind – are usually readily available at area nurseries and stores at approximately the right time for planting. You can also shop plant sales (generally in May) in your area to discover new varieties.
But it’s so much fun to peruse the seed catalog in search of something different.
Always consider your USDA growing zone when selecting seeds or plants. A general map for Nevada. In the Reno area, it’s zones 7a and 7b, but higher elevations may be in a lower-numbered (colder) zone. Pay attention to the average growing season days. I can safely plant perennials rated for zone 7 or lower as soon as the soil can be worked, but if I plant any annuals (such as tomatoes) outside before May 15, I am ready to protect them from late frost. Knowing your USDA zone helps you learn when to start seeds (considering germination time and approximate dates for last frost, and when to set your seedlings out in the garden beds or pots).
Here are some local tomato favorites, gleaned from surveys, my Extension Master Gardener friends, and personal experience:
Cherry tomatoes
These small bursts of flavor, have a relatively short growing season and are adaptable to containers, though some will still need a trellis or other support. ‘Sun Gold, ’ 'Sweet 100,’ 'Midnight Snack', ’ Purple Bumblebee.’ Try: ‘Atomic Grape’ and ‘Sunpeach.’
“Salad” tomatoes
Medium-size fruit. “Bush” types have a shorter growing season but tend to produce their fruit all at once. Climbing types like ‘Early Girl’ produce early but keep going until frost. ‘Fourth of July' slows during hot weather. Try: ‘Heat Master’.
Paste tomatoes
Meaty, with less juice. Good for salads, cooking, and salsa. ‘Roma,’ ‘San Marzano.’ Try: ‘Paisano.’
Slicing tomatoes
Larger fruit, great for slicing and sandwiches.These varieties tend to require a longer growing season and need consistent irrigation to avoid common problems like blossom-end rot. Modern hybrids like ‘Better Bush’ and ‘Celebrity’ can offer disease resistance, but there are many flavorful heirlooms like ‘Cherokee Purple,’ ‘Brandywine,’ ‘Mortgage Lifter,’ and ‘Black Krim,’ as well as newer introductions like 'Berkeley Pink Tie Dye.’
Seeds are not inexpensive. Expect to pay about $5.95 for a packet of 10 to 30 seeds. As suggested, consider a variety’s growing season and remember that the days-to-maturity figure usually is calculated from the time you transplant it, not from the time you start the seed. If you have only 90 frost-free days where you garden, don’t expect good results with a tomato variety that takes 110 days to mature! Read the seed packet carefully for information about growth habits, space, support, diseases, and pests. Home-grown tomatoes are a treat, but they are not necessarily easy to grow. Tomatoes take a lot of care.
Gather your seed starting supplies.
- Seeds
- Seed starting pots or cell trays
- Plant markers
- Seed starting mix (homemade or store-bought)
- Seed tray with humidity dome (often called a 1020 plant tray or propagation tray, or use any tray with drainage, and cover it with plastic wrap)
- Spray bottle or squirt bottle filled with water
- Light source (sun or grow light)
Although many gardeners start seedlings in a sunny windowsill, I don’t have a suitable space for that in my house. But a setup with an artificial grow light, optionally with a timer, can be set up in any out-of-the-way place big enough to accommodate a seed tray and an overhead light, with an electrical plug nearby.
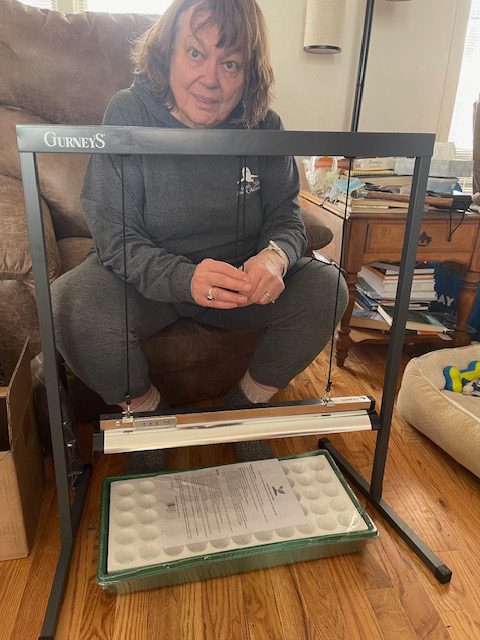
Beth and her seed-starting setup, with adjustable grow light.
Photo by John Heggeness.
Sowing Seeds
Fill containers that have drainage holes with seed-starting mix, moisten the mix thoroughly, and plant seeds at the depth recommended by seed packet. Cover with the humidity dome or plastic wrap. You may need to remove or vent this covering occasionally to prevent excess moisture. If beads of water are forming on your humidity cover, you risk a fungal disease called damping off, which can cause your tender seedlings to collapse and die. Place the seeded containers in a second, solid-bottomed tray to allow drainage. You may use a heat mat under the tray to speed germination. Optimal temperatures are daytime 60-80 degrees F, nighttime 55-70 degrees F.
Seed Germination
When seed cotyledons emerge, remove the humidity covering and heating mat (if used), and place the seedlings under a grow light for 12-14 hours daily. Ideally the light should be one to two inches above the growing seedlings, so move it up as the seedlings grow to prevent them from stretching to reach the light. Keep the soil consistently moist, but not wet. Fertilize the seedlings with a dilute solution after the first set of true leaves appear.
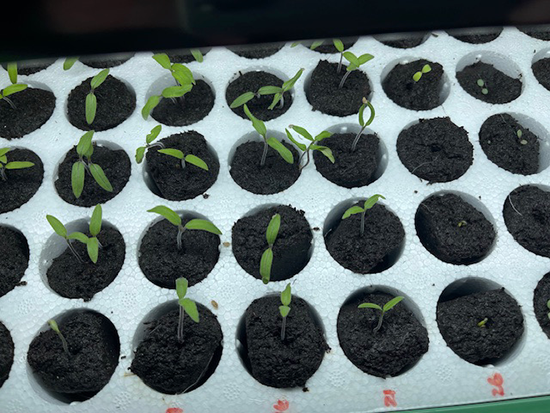
Emerging seedlings. The first leaves to appear are cotyledons.
Photo by Beth Heggeness.
Thin plants if necessary by trimming at the soil line.
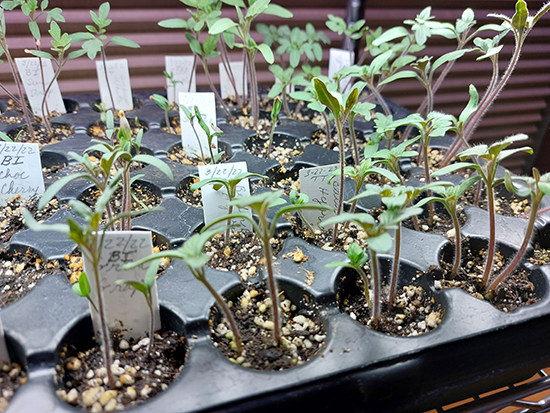
Tomato seedlings that need to be thinned to one healthy plant per cell.
Photo by Cindy Edwards.
Transplanting Seedlings
Move your seedlings into three- or four-inch pots when they have two or three sets of true leaves. Tomatoes don’t mind deep planting; the stem can be buried almost up to the first true leaves. This way will encourage more roots to grow. Continue to provide consistent moisture and fertilize as recommended by fertilizer package instructions.
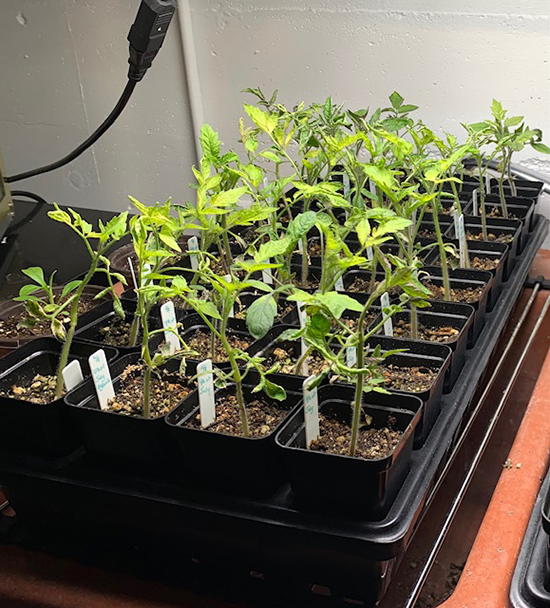
Tomato seedlings in three-inch pots.
Photo by Kim Hobson.
Acclimate or “Harden Off” Plants
When plants have four to six true leaves, about two weeks before transplanting to the garden bed, begin to acclimate your seedlings to the outdoors. Gradually increase the plants’ time outside, exposed to sun and wind, but be sure to initially provide shelter at night. When garden soil is 65-70 degrees F, transplant into the garden. Be sure to continue to monitor the weather. Some gardeners like to plant earlier than the average recommended May 15 date by using protective coverings at night. There are many commercial products for that, but gallon milk jugs with the bottoms cut off work nicely until the plants outgrow them, by which time the frost danger may be past.
RESOURCES
Northern Area (Reno) Planting Schedule: https://extension.unr.edu/publication.aspx?Pubtitle=5006
“Easy to Make Grow Light Stand,”Kansas State University Research and Extension: https://www.youtube.com/watch?v=s_XsyTOYM_M
“Grow Your Own Transplants at Home,” Utah State University Cooperative Extension: https://tinyurl.com/growyourowntransplants
“Starting Seeds Indoors,” University of Minnesota Extension: https://extension.umn.edu/planting-and-growing-guides/starting-seeds-indoors
“2.5 Reading a Seed Packet,” Cornell University Cooperative Extension, https://gardening.cals.cornell.edu/lessons/project-s-o-w-seeds-of-wonder-food-gardening-with-justice-in-mind/unit-2-gardening-with-gratitude/2-5-reading-a-seed-packet/
The Results Are In: Master Gardener Tomato-Growing Contest
Photos & article by Kim Hobson
The tomato-growing showdown has come to an end, and what a fruitful competition it was! Our Master Gardeners pulled out all the stops to cultivate the best tomatoes in town, and the results are nothing short of incredible. After careful weighing, tasting, and admiring, we are excited to announce the winners of this year's contest.
And the Winners Are...
Biggest Bonanza: Melody Hefner with a massive 1 lb., 7 oz. ‘Big Rainbow’ tomato that could feed a small family! The judges noted “Beautiful color, uniform for an heirloom” and more importantly, “How did the branch hold this?!”
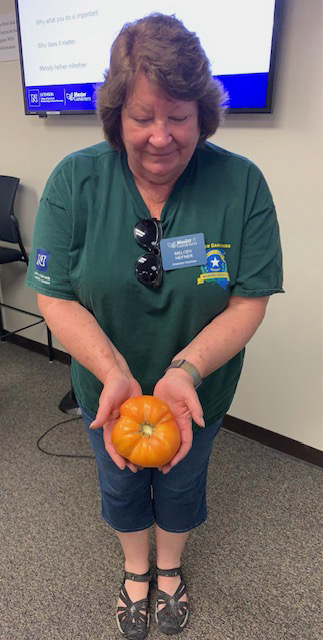
Melody Hefner holding her ‘Big Rainbow’, the size winner.
Most Unusual: Liz Morrow with good things come in small packages, ‘Aunt Molly’s Ground Cherry’. Judges proclaimed, “Never seen one like this, interesting packaging.” They also noted its sweet flavor.
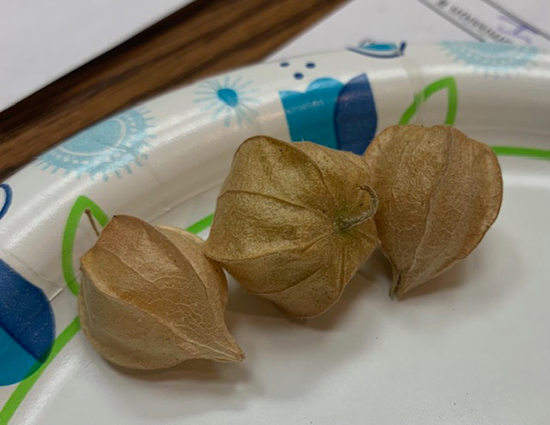
Liz Morrow’s ‘Aunt Molly’s Ground Cherry’, the winning entry for most unusual tomato.
There was stiff competition in this category, with a tie for second place.
Second-place winners: Melinda Gustin with ‘Red Zebra,’ noted for beautiful marbling, incredibly uniform, and delicious. It tied for second with Doreen Spires’s ‘Wild Boar Atomic Grape,’ praised for visual appeal and delicious fruit flavor.
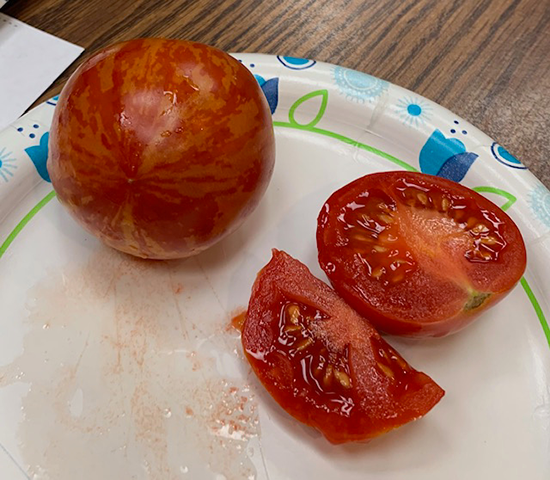
Melinda Gustin’s ‘Red Zebra’ tied for second place in the most unusual category.
Best Tasting: Doreen Spires with ‘Wild Boar Atomic Grape’ impressed the judges with its “Deliciously sweet flavor with perfect texture.”
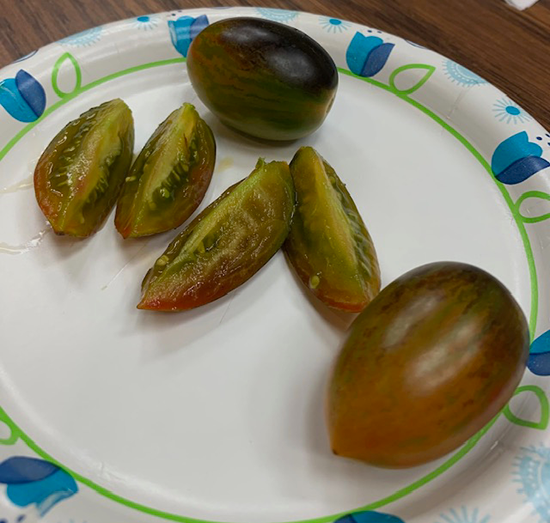
Doreen Spires’s ‘Wild Boar Atomic Grape’ tied for second in the
most unusual category and won the best-tasting category.
Second place:
Linda Fulton’s ‘Cherokee Purple,’ which was noted for its “Beautiful, rich deep flavor.”
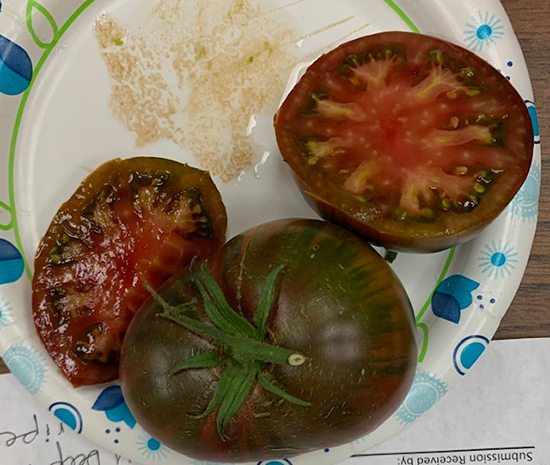
Linda Fulton’s ‘Cherokee Purple’ took second place in the best-tasting category.
Third place: Melinda Guston’s ‘Red Beefsteak Heirloom.’
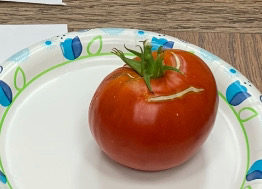
Melinda Guston’s ‘Red Beefsteak Heirloom’ took third in best-tasting.
Congratulations to All Participants!
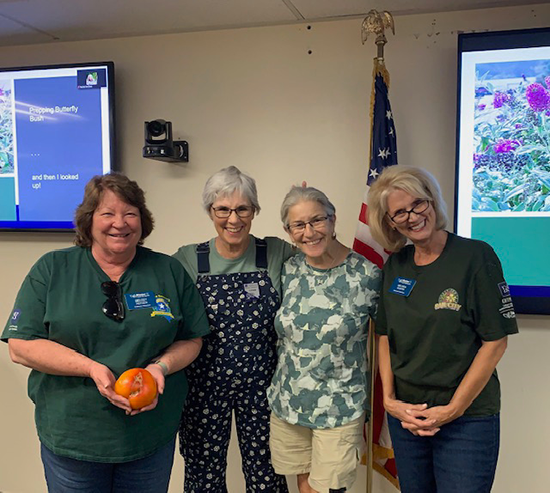
The winners from the left:
Melody Hefner, Linda Fulton, Doreen Spires, and Melinda Guston.
Let’s give these champions a round of applause, or as we call it — tomato sauce! From big to small, every tomato was grown with care, and we couldn't be prouder of our Master Gardeners.
A big “Thank You!” to our esteemed judges: Megan Andrews, commercial horticulture program coordinator; Angeline Jeyakumar, associate professor and nutrition specialist; and Amber Yoder, budget analyst.
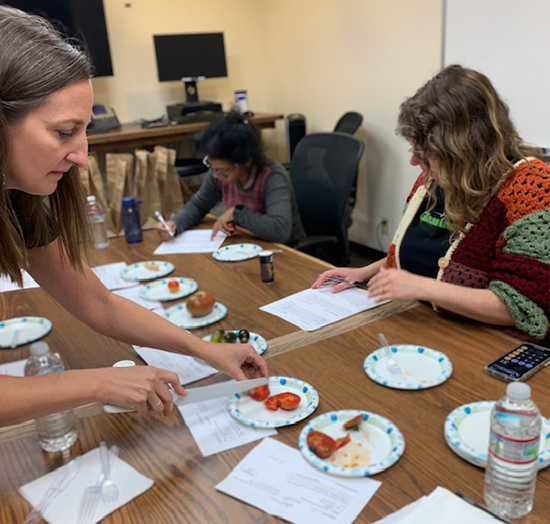
The judges from left: Amber Yoder, Professor Jeyakumar and Megan Andrews.
Winter Water for Birds
photos & article by Becky Colwell
Don’t forget our avian friends this winter. Some of you may feed them throughout the winter, but do you also remember to provide them with daily water? Water is especially important during the winter months. It helps them conserve energy because they don’t have to use their body heat to melt ice or snow, and they need water to drink as well as to keep their feathers clean. Their feathers keep them warm during the cold winter months.

A robin taking a January bath.
I provide water year round in various spots, usually under trees or near bushes. After bathing, the birds like to preen on the nearby branches. During the winter I keep two watering spots, one under my Austrian pine and the other in a sunny south location between sagebrush. Both of my water containers are on the ground and I fill them daily. The containers should be shallow – a depth of one to two inches is all they need – with sloping sides and a rock or other object for the birds to land on.
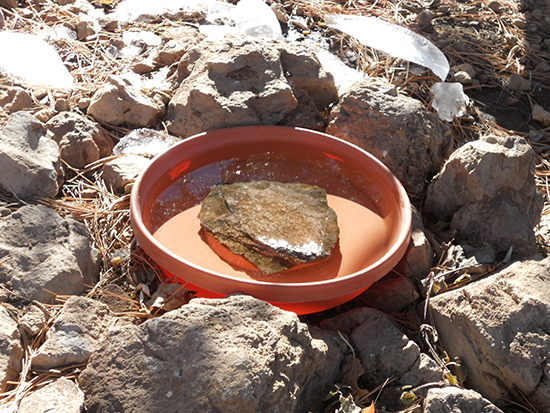
A large plastic planter saucer with a landing rock under my Austrian pine.
It’s important to keep it clean and filled. By midmorning the ice has softened enough so the container can be emptied and fresh water added. Watching the birds come to drink and bathe is one of my favorite winter pastimes.
Having birds in your yard and nesting is another form of natural pest control. They eat insects for protein and feed them to their young. Gardening with birds is also good entertainment, listening to their songs and observing their antics.
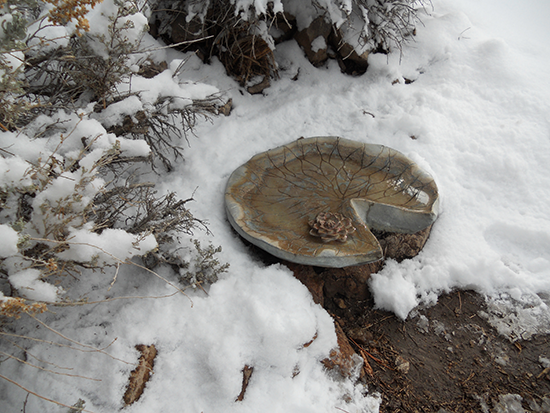
A concrete lily pad made by a friend. The birds really love this one.
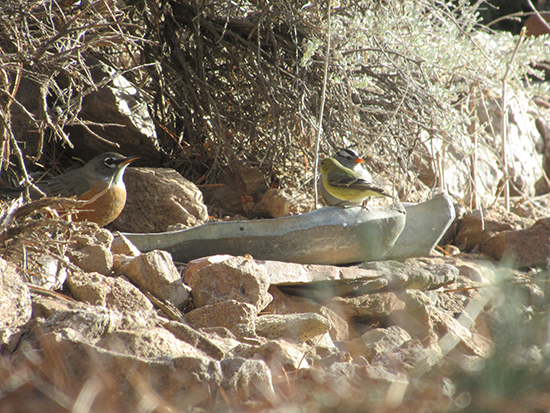
Robin, finch and sparrow sharing water on December 24, 2020.
Planting Seeds Indoors
Photo and Article By Rod Haulenbeek
So you have this packet of seeds, and you want to plant them for future flowers. There are some steps you have to take, but for many of you it’s well worth it. This article is necessarily short, but there are plenty of details covered by online articles and videos.
Your objective is to mimic nature’s way (to the extent you can). When a seed is planted in the fall outdoors, it doesn’t immediately germinate. The seed has an impermeable hard coat, which is weakened during our Northern Nevada winter by cold soil and moisture. This wets the waiting plant, which starts growing a root. When the soil temperature reaches the point where the plant can grow above ground without damage from the cold, the plant puts up leaves.
A seed planted indoors with temperatures from the 50s to the 70s, and kept moist, grows more robustly than one planted outdoors. This, in effect, is the same as planting the seed outdoors in spring when temperatures are warmer and irrigation is maintaining moisture.
The seeds of many plants can be planted directly from the seed packet into the planting medium. But some seeds require both cold and moisture for germination, even if the intent is to start them indoors. For this, gardeners use a method called “cold stratification.”
In cold stratification, seeds are moistened and placed in the refrigerator for about 30 days. Small seeds can be sprinkled on damp paper towels, which are then rolled up and kept in plastic bags; larger seeds can be sown in a moistened inorganic medium like vermiculite and covered loosely with plastic. When the seeds sprout roots, move them immediately to containers filled with vermiculite or perlite and cover them with a thin layer of potting mix that has been moistened but not drenched.
There is a great variation in planting containers:
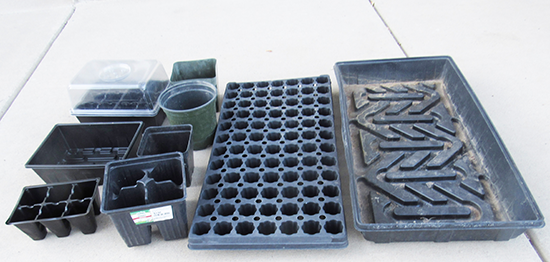
Various planting containers that I use in starting seeds indoors.
The one in the far right is the one I prefer for those seeds less than 2mm in size, which I find hard to plant individually. Since I plant several different kinds of seeds, I spread each over a different part of the tray. If you are planting only one kind of seed, you may wish to use a smaller container such as one of the three in the middle of the picture.
The tray in the middle is called plug tray; the one in the picture can accommodate 84 plugs. You can also use a container with multiple cells, as shown by the two in front left.
The planted container needs four things:
- An identifying label. I use a fine-tipped permanent marker and a small plastic stake.
- A light source. A south-facing window may provide enough light for leaf formation and seedling growth; otherwise, you will need artificial lighting. You can use incandescent, LED, fluorescent, or so-called “grow light” bulbs.
- Moisture. The containers need to be kept moist but not wet during this whole process. One method is to squirt the container with a spray bottle daily. Or you can use a “humidity dome” like the translucent one in the back left of the picture (this minimizes evaporation).
- Fertilizer. That little seed has enough stored energy to get started, but at some point you will have to add some type of fertilizer. One option is to use a diluted fertilizer solution in a spray bottle once or twice a week while the seedling is in the container.
Some people also use “heat mats,” which provide bottom heat to the container, until the seedling gets its first true leaves. Kept on a heat mat for too long, however, the seedlings may stretch and get spindly.
A diagram found at k8schoollessons.com/germination/ illustrates the germination and early growth process. (How many of us have seen the demonstration in school where a bean seed germinates?)
The seed first sprouts a root, which pulls moisture from the planting medium to provide water for growth. As time goes on, the seed unfurls a stem above ground and leaves form.
Seedlings vary a lot in form. Since I plant dozens of kinds each year, I compare the seedling with online pictures to make sure I have properly identified the plant.
Depending on how rapidly the plant grows and how large the original container is, the seedling will eventually have to be moved into a larger container, with regular potting soil, or to the landscape. This will be covered in the March newsletter.
Mark Humphreys and I will be giving a much more in-depth presentation on this on Feb. 11 as part of the Bartley Ranch Master Gardener Series.
Dreaming of Your Own Backyard Greenhouse?
Photos and Article by Kim Hobson
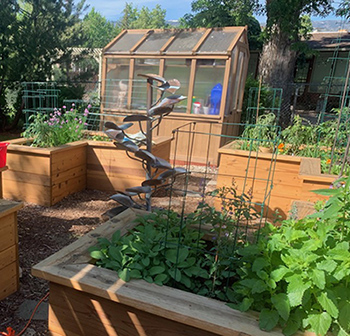
Greenhouse shown is 7.8 x 6.7 feet, built from a kit consisting
of a wood frame and double-wall polycarbonate panels.
Have you been scrolling online and come across those picture-perfect greenhouses? You know the ones, overflowing with award-winning plant specimens basking in optimal light, and thinking “If only…”.
In Washoe County, our particular challenges – wild temperature fluctuations, nutrient-poor soils, wind, and a short growing season – can lead to gardener frustration, especially for recent transplants to our community. A backyard greenhouse can offer you an exciting opportunity to extend the growing season, protect plants from extreme weather, and create an ideal environment for various vegetables, flowers, and herbs. Whether you are a seasoned gardener or just getting started, building a simple greenhouse can elevate your gardening experience.
You may have been tempted by the prefabricated greenhouse structures available at big box stores or have plans to build your own. To ensure your success, take time to think things through before embarking on this adventure!
First, check with local authorities to see if you need building permits or if there are restrictions on the size of structures permitted in your area. If your house is part of a Home Owners’ Association, check the HOA rules for any restrictions as well.
It's essential to consider factors in YOUR backyard that may influence the effectiveness and longevity of your greenhouse. Our high-desert climate is generally characterized by low humidity, hot summers, and cold winters. But you’ll need to address specific aspects like wind (both strength and prevailing direction), temperature extremes, and sun exposure.
A home at a higher altitude means greater exposure to intense sunlight during the day, and temperatures can drop quickly at night, especially in winter. A greenhouse is invaluable for protecting plants from those extreme temperature fluctuations. Wind is another critical factor. Our area is prone to strong gusts, especially in more exposed locations. It is important to choose a sturdy greenhouse structure that can withstand these winds. Additionally, placing the greenhouse in a position that maximizes sunlight – especially during the winter when daylight hours are shorter – will help ensure your plants get the light they need to thrive.
Irrigation is an essential consideration for your greenhouse. You will need to establish an efficient watering system, such as drip irrigation, to keep your plants hydrated without wasting water. Soil in our region can be sandy and low in nutrients, so you will need to use a commercial potting soil to create a fertile growing environment.
You can find many options for your greenhouse, from prefabricated kits to DIY builds. Understanding the materials and designs can help you make the right choice for your garden and your budget.
Prefabricated greenhouses are a popular choice for backyard gardeners because of their convenience and ease of assembly. Stores like Costco and online retailers offer greenhouse kits that come with pre-cut panels and frames, making them quick and easy to put together. The tradeoff is that the kits may come with limitations for customization.
If you're handy with tools, building a greenhouse from scratch can be a rewarding project. However, DIY builds often require more time, patience, and expertise compared to prefabricated kits.
The material you choose to cover your greenhouse will affect its durability and the growing environment inside. Glass offers the clearest light transmission, but it is heavy and can break in strong winds. Polycarbonate is a popular choice because of its strength and insulating properties, while polyethylene film is lightweight and affordable but may require replacement after a few years.
Many prefabricated greenhouse models for backyard gardeners are made with aluminum frames and durable polycarbonate panels. These greenhouses are designed to withstand moderate weather conditions and are relatively easy to assemble. But remember, our area is prone to strong gusts, especially in more exposed locations; therefore site consideration and proper anchoring is critical.
Pros and Cons of the Prefabricated Greenhouse:
Pros:
- Easy to assemble with pre-cut materials
- Durable aluminum frames and polycarbonate side walls that offer good insulation
- Relatively affordable and available in various sizes
Cons:
- Not customizable compared to a DIY build.
- May require additional anchoring in windy areas like ours.
- Limited ventilation options without modifications.
Installation Process and Requirements:
Greenhouse kits typically come with detailed instructions for assembly. It is recommended that you prepare the foundation before assembly begins, as a level surface helps ensure the structure’s stability. Anchoring the greenhouse with additional supports can help prevent wind damage.
Site Selection:
Choosing the right location for your greenhouse is one of the most important decisions you will make. Proper site selection will help ensure your plants receive enough sunlight while being protected from the elements.
Choose a site that gets at least six hours of sunlight per day, especially during the winter months when days are shorter. Ideally, your greenhouse should be oriented east to west to maximize sunlight exposure throughout the day.
If possible, place your greenhouse near natural or artificial windbreaks like fences, trees, or buildings. Be sure the area has proper drainage to avoid water pooling around the base of the greenhouse.
Once you’ve chosen and leveled a building site, you need to decide what type of foundation your greenhouse will sit on. A concrete slab is a solid, long-lasting option that is ideal for larger greenhouses. Wood-frame foundations (using pressure-treated lumber) are easier to install than concrete and provide a strong, durable base, but may need maintenance over time. Gravel foundations are simple and affordable, provide excellent drainage, and work well for smaller, lightweight greenhouses. In our area, a wood-frame foundation anchored deeply into the ground may offer a cost-effective yet strong foundation against our wind gusts. A gravel floor may be added to facilitate drainage.
Regardless of the type of foundation you choose, gravel or another drainage material should be placed around the perimeter to prevent water from pooling.
Proper ventilation is crucial to control temperature and humidity inside the greenhouse. Prefabricated greenhouses usually come with roof vents or side vents. If your greenhouse does not have enough ventilation options, you may need to install additional louvered vents or an exhaust fan to ensure good airflow during hot Nevada summers.
Depending on how you plan to use your greenhouse, you may want to install heating for the winter months. Options include electric heaters, which are effective but can increase construction and energy costs. Passive solar heaters use thermal mass (such as barrels of water or stone) to absorb heat during the day and release it at night.
Propane or gas heaters are more powerful but add to the construction and operating costs, and will need ventilation for safety.
Additional Costs
- Once the structure is complete, you will need shelves, benches, and tables for growing plants that can withstand the humid environment inside.
- You will need to purchase growing trays, pots, and irrigation supplies.
- If plants are being grown on stacked shelves, consider adding grow lights to ensure each shelf gets adequate light.
- Consider installing an automated drip irrigation system, both to provide consistent watering and to maintain humidity. Greenhouse temperatures can rise quickly, drying out both the soil and the air.
Maintenance and Upkeep
- Regularly clean the panels to allow maximum light transmission.
- Inspect the structure after storms to ensure it remains stable, especially in wind-prone areas.
Pest Control and Plant Care
- Use screens on ventilation openings to keep pests out, and regularly check plants for signs of disease or insects.
- Adjust watering schedules according to the season.
This is only the beginning of what you should consider while contemplating a backyard greenhouse of your own, but it is a good place to start. As the weather cools and your thoughts turn to seed catalogs and your plan of attack for next year’s garden, keep those dreams alive by researching your options, and plan a strategy for success!
Resources
https://hgic.clemson.edu/factsheet/hobby-greenhouses/
https://utia.tennessee.edu/publications/wp-content/uploads/sites/269/2023/10/W935-B.pdf
https://ag.umass.edu/greenhouse-floriculture/fact-sheets/designing-building-home-greenhouse
https://extension.missouri.edu/publications/g6965
https://www.extension.purdue.edu/extmedia/ho/ho-238-w.pdf
It’s Coming Up Roses
Photos & article by Carol Munden
Have you ever wandered through the Reno Municipal Rose Garden? It is located in Idlewild Park between the police memorial and the California building. The city website says the one-acre garden has over 200 varieties and over 1,750 individual rose bushes. Inside the fenced garden are 114 beds. In addition to the beds, climbing roses line the fence line, and additional bushes front the fence.
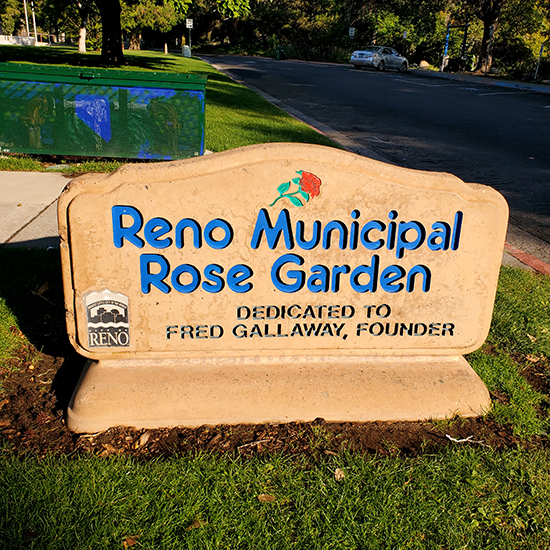
The rose garden is dedicated to its founder, former Reno horticulturist Fred Gallaway.
The rose garden is dedicated to Fred Gallaway, who was the city horticulturist for over 25 years. He established the garden in the 1950s at the spot of what was once a small zoo in the park. At the north entrance of the garden is a mosaic created by Eileen Gay. This beautiful piece of artwork will welcome you.
The main entrance is a lovely place to start, where stairs lined with rose bushes lead up to the garden. If you are unable to navigate the stairs, park in the police memorial parking lot. Walk just past the memorial to the gate that leads to the two sidewalks that go through the garden.
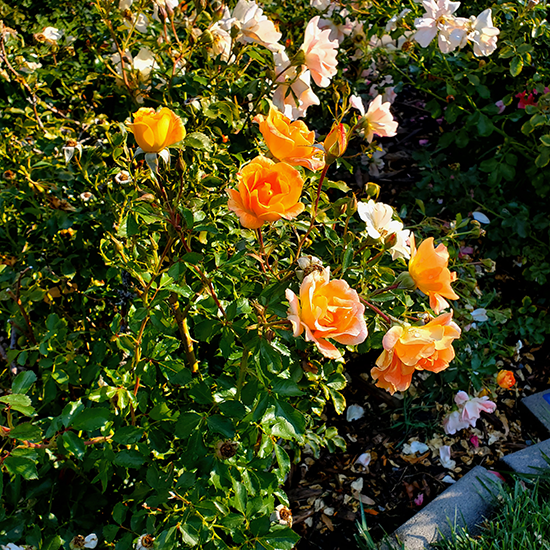
Rosa ‘Gypsy Dancer’ is a hybrid shrub rose that grows up to four feet tall and spreads up to three feet.
What is amazing is the diversity of the roses. There are prolific budding bushes and modern hybrid tea roses with the showy buds we are used to seeing in floral bouquets. There are old garden roses which bloom only once a season. There are ground cover roses and a few miniatures. Many are polyanthas, which is a modern type of rose cultivated to produce multiple attractive blooms all season. On the east side of the garden, you can see some varieties you don’t usually think of as garden specimens, such as the rugged rugosa roses that often form thickets in some parts of the world. Some in this area have an interesting history, such as the Damask rose whose origin is thought to go back to the 1500s around Iran where it was propagated for its perfume qualities.
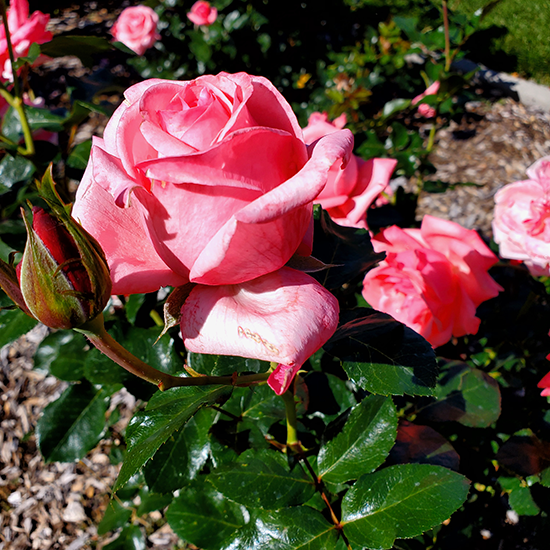
Rosa ‘Brigadoon’ is a hybrid tea with showy pink and white, fragrant flowers.
The garden work year begins in late March. The Reno Rose Society has traditionally held pruning demonstrations open to the public on the last Saturday of March. Unlike in milder climates, pruning does not begin any earlier as pruning stimulates growth which can be harmed by our late frosts. Most of the roses bloom on new growth and benefit from being pruned before the first bloom. A few varieties, like old garden roses, will be pruned after the first bloom.
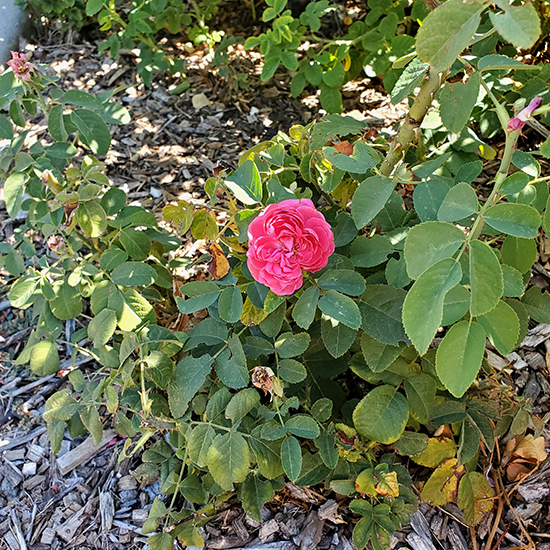
Rosa ‘Rose de Rescht’ (Portland Rose) is a very fragrant old garden rose.
When mature it is a nicely shaped 3- to 4-foot tall bush.
By mid-September, even though many varieties are still blooming, dead-heading is stopped to allow the bushes to form rose hips and strengthen their roots for the winter. Fall maintenance and weeding continue until after the hard frost. Although maintenance of the garden is done by the city of Reno, much of the pruning and dead-heading is done by a few City of Reno volunteers with direction from the city horticulturist and a member of the rose society. The city is usually looking for volunteers as posted in the north gazebo and their website. The number to call is (775) 334-2270.
Many of the beds are marked with memorials to loved ones. Before you leave the garden, spend a few minutes at the fountain dedicated to the former Reno horticulturist Pamela Bedard. Enjoy the peaceful beauty of the garden and come again.
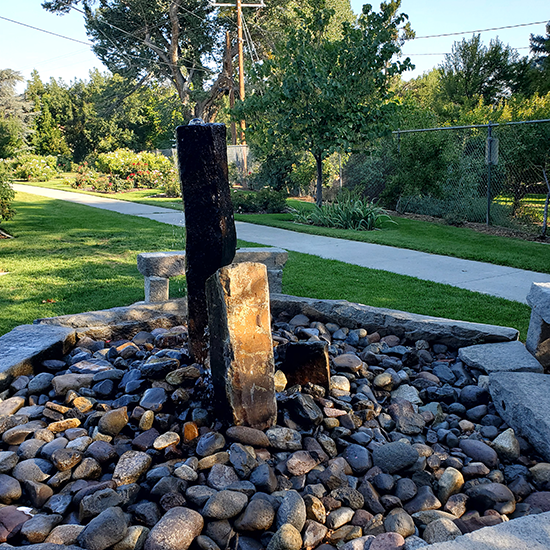
The fountain in the rose garden dedicated to the former Reno horticulturist Pamela Bedard.
References:
- Fisher, J. 2018 “Different rose varieties need different pruning,” https//extension.unr.edu/publication.aspx?pubtitle=2131.
- renorosesociety.org
- https://www.reno.gov/government/departments/parks-recreation-community-services/parks-trails/rose-garden.
Gratitude
We have so much to be thankful for. The University of Nevada, Reno Extension Master Gardener Volunteer Educator program is full of amazing volunteers who are committed to finding and providing scientifically based, university researched horticultural information for people in our community.
We could not do what we do without the help and support of our community, our University and Extension Partners and the amazing dedication of our Master Gardener Volunteers. Within our program we have some extra special volunteers known as Leads. They are the lead volunteers of various programs and activities. Leads are Master Gardeners that dedicate extra time to organize, plan, and execute tasks related to their project or activity. They do this by committing extra time to the program to lead and mentor other Master Gardener volunteers and give them the resources and confidence to support our community. They make a huge difference in our community as a whole and especially to the Master Gardener Program.
One such activity is the Master Gardener Newsletter. Master Gardener Lead Becky Colwell began our recent issues a few years ago. The newsletter was initially for Master Gardener Volunteers only, but with Becky’s dedication and support of her co-lead, Chris Doolittle, it has become what you see today and is public facing. Becky has been involved in many aspects of the program from the gardens at The Pioneer Center for the Performing Arts, Extension Native Plant Demonstration Gardens and the Newsletter. Let’s take a minute to get to know Becky from a recent interview:
1. What sparked your interest in gardening?
"My dad worked for the then Soil Conservation Service, so he was an influence on me. He always planted a big vegetable garden that I helped maintain. I love working outside. I would prefer to be outside in my garden than indoors doing chores or cooking”.
2. What is your gardening passion?
''Native plants. They are xeric, grow in our soil without fertilizer, and provide food for our pollinators, beneficials [insects], and birds. Most native plants are left alone by the nibbling rabbits and squirrels. I have spent the past 20 years landscaping my hill with native plants.”
3. How has the Master Gardener program scientifically helped you in your garden?
''I found the Botany classes most beneficial. Before having these classes I was unaware of the importance of using Latin names to identify plants and also knowing the correct names for flowers, and leaf parts, and their functions. Many plants have a different name in different regions, but the scientific names/Latin names do not change so it more accurately labels a plant. I also learned that when writing Latin names, the genus is capitalized, and both the genus and species names are italicized. This has really helped me with the newsletter articles, making sure we are writing these correctly. Knowing the many leaf shapes and parts of the flower has helped me to try and identify unknown plants, especially wildflowers.”
4. What makes you smile about the Master Gardener Program?
"I enjoy the people and that we have a common subject to talk about when we are together. I like that I am always learning something new.”
5. Share a meaningful Master Gardener volunteer experience?
''I really enjoyed working in the school gardens with the 4th and 5th graders. Teaching the students how to grow vegetables through hands-on activities was very satisfying. I learned a lot about growing vegetables myself. I also enjoyed volunteering on the Pioneer Theatre grounds. We would get many appreciative comments from people passing by.”
6. One word to describe the Master Gardener program?
'Learning.''
7. Describe your project?
''I am in charge of the Master Gardener newsletter. The newsletter provides research-based information regarding any topic relating to gardening in our area. The articles are written by Master Gardeners. The more people who submit information, the more variety of information we are able to add to the newsletter”.
8. What is your vision for your project?
''I would like to provide more variety and possibly a theme-related series on different gardening topics. Now that the newsletter is public, I am hoping we can provide more educational, research-based information for the challenges we have gardening in our area.”
9. How will you put that vision into practice?
''This past year an actual group of writers have volunteered to be on the newsletter committee. These Master Gardeners have a wide variety of interests and have been contributing articles on many seasonal specific topics. We have also planned out future articles, and some writers are taking a topic and writing seasonal information for each issue.”
10. How does your project benefit our community?
''I am hoping our community is becoming aware of our newsletter and are finding the articles helpful.''
11. What keeps you involved in the Master Gardner program?
''I love learning and helping others to learn also.''
12. What little-known facts about your project would you like others to know that they likely don't know?
''The information in the newsletter is checked for accuracy. This is for original pictures also. More than one resource is usually used.”
Master Gardener Photos
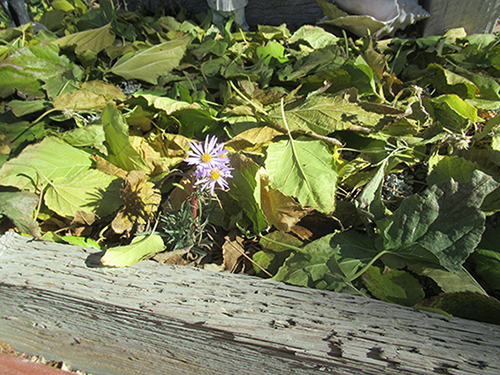
November blooming aster
by Becky Colwell
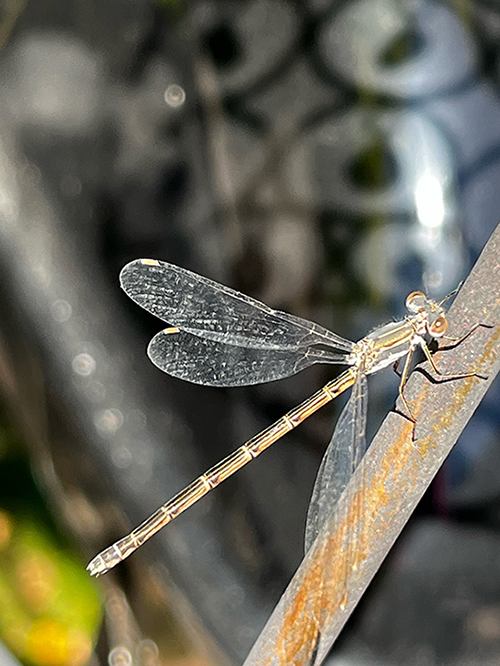
Resting beneficial damsel fly
by Joan Bohmann
Questions or comments?
Reach out to us!
Help Desk Hours: 10 a.m. - 2 p.m. Tuesdays, Wednesdays & Thursdays
Phone: 775-784-4848
Email: ExtensionWashoeMG@unr.edu
Rachel McClure Master Gardener Coordinator
Phone: 775-336-0274
Email: rmcclure@unr.edu
How to become a Master Gardener
WASHOE COUNTY MASTER GARDENER EVENTS
MASTER GARDENER HELP DESK


