Low Impact Development in Northern Nevada: Bioretention
Introduction
Low Impact Development (LID) is a sustainable strategy for handling stormwater that uses techniques that aim to mimic the way water behaved on the site before development occurred. LID uses a variety of design and pollution-prevention techniques, including bioretention, to compensate for impacts such as increases in runoff flow rate and volume and water-quality impairment. One of the most recognized and widely applied sustainable stormwater management techniques is called bioretention.
How do bioretention features work?
Bioretention is the practice of routing stormwater to landscaped depressions filled with porous soil and covered with a thin layer of mulch. Unlike typical landscape designs that focus on raised planters or islands, these features store water in gentle depressions. Plants, including grasses, shrubs and small trees, are grown in the bioretention feature. The plants promote evapotranspiration, maintain soil porosity, encourage biological activity and absorb some pollutants. When located over silt- or clay-rich soils with slow infiltration rates, bioretention features typically require perforated drainage pipes called underdrains to facilitate proper drainage.
Runoff from an impervious area, such as a parking lot or roof, is directed into a bioretention area. The flow can be contained within a planter box located at ground level or be diverted into a larger landscaping feature. The water infiltrates through the plant/mulch/soil environment, providing pollutant treatment. Infiltration rates must be tested prior to installation to ensure water does not remain ponded in the feature for longer than a few days to discourage mosquitoes and other vermin. Supplemental irrigation is needed for most bioretention features in northern Nevada to ensure plant survival during extended dry weather periods.
Bioretention features are designed to retain the stormwater runoff volume produced by the most frequently occurring rainfall or runoff events. This is determined from records of storm events in the area. For larger storms, most large bioretention features are designed so that any overflow of stormwater runoff is diverted to a conventional stormwater conveyance system, such as a storm drain. Even though the bioretention feature may not be able to retain all the stormwater from these large events, some settling and filtering of the stormwater occurs before it overflows to the conventional storm drain system.
 \
\
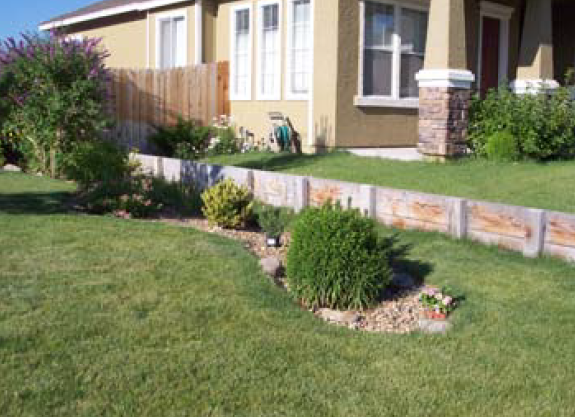
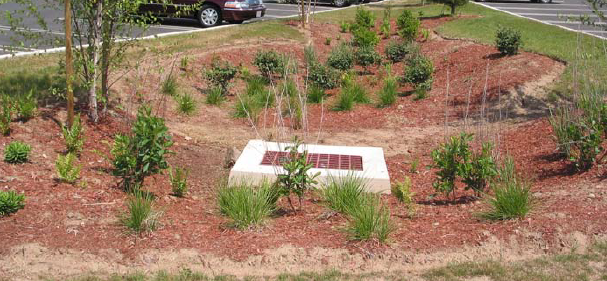
This residential rain garden captures and filters runoff water. Image by Chris Conway.
Benefits of Bioretention
- IMPROVES water quality
- REDUCES postdevelopment stormwater volumes and offsite flows
- INCREASES groundwater recharge
- COSTS LESS to design, install and maintain than conventional stormwater technologies
- PROVIDES attractive landscaping
- ENHANCES wildlife habitat
LID is used because it is:
- EFFECTIVE in reducing and treating urban runoff
- ECONOMICAL, when less infrastructure is required for LID practices than for traditional stormwater features
- SIMPLE! Most LID features are not highly engineered, expensive or elaborate
- FLEXIBLE and customized for each site
- USEFUL in achieving multiple objectives: stormwater management, landscape beautification, habitat improvement, open space connectivity, etc.
- DESIRABLE, because it adds value when the landscape features used to achieve LID goals are also aesthetically pleasing. This can increase property values.
Where can bioretention be used?
Bioretention features can be constructed on individual sites, within a new development, or even retrofitted into an existing landscape. This technique can be as simple as directing the downspout of gutters to a landscaped garden bed or rain garden instead of the driveway or street. In a commercial setting, bioretention can be incorporated into parking lot islands and perimeters, street median strips, driveway perimeters, the centers of cul-de-sacs and virtually anywhere landscaping is planned, including planter boxes located next to buildings.
While they should be planned in advance, bioretention areas are one of the last features to be installed within a new development. To prevent clogging and provide pretreatment, include grass buffer strips or swales leading into the feature.
Consider existing vegetation and drainage patterns and the location of existing or proposed underground utilities, including septic or sewer systems, water lines and storm drain pipes, when designing the system. These systems are most cost-effective when applied to areas with minimal slope, well-draining soils and low sediment loads, which helps to discourage clogging. Mark areas that will incorporate bioretention into native soils before work begins to avoid soil compaction during construction. Vehicular traffic other than what is specifically necessary to construct the facility should not be allowed within 10 feet of planned bioretention areas.
If proposed to be located in“hotspot” drainage areas near gas stations or other businesses that have high potential pollutant loads, or areas with known soil and/or groundwater contamination, bioretention features must be designed as flow-through planters that do not allow infiltration into underlying soils. Flow-through bioretention facilities are designed to temporarily store stormwater within an impermeable container, such as a concrete box or a liner. These facilities collect filtered stormwater in perforated underdrain pipes located at the bottom of the impermeable container and drain to an approved discharge point, such as a ditch or storm drain.
Where an approved discharge point is available, flow-through bioretention facilities can also be used in areas that have poorly draining soils, where the water table is within 6 feet of the ground surface, next to buildings, on steep slopes, or at sites with other constraints that prevent infiltration of stormwater into underlying soils.
Do rain gardens actually work to improve water quality?
The pollutant removal effectiveness of bioretention basins has been the focus of several studies. The publication, “Design Guidelines for Stormwater Bioretention Facilities,” University of Wisconsin-Madison (2006), lists the following typical pollutant removal rates for these facilities.
| Pollutant |
Removal Rate |
| Total phosphorus |
80% |
| Metals (copper, zinc, lead) |
>90% |
| Total Kjeldahl nitrogen |
65-75% |
| Total suspended solids |
90% |
| Ammonium |
60-80% |
| Organics |
90% |
| Bacteria |
90% |
How are bioretention features maintained?
Maintenance needs include typical landscape maintenance tasks, such as pruning, mowing, adjusting and monitoring irrigation systems, hand weeding, trash collection and replacement of dead plants. The mulch layer should be removed if it is reducing the water storage volume, and the surface soils should be excavated if clogging has occurred. Minimize the need for fertilization by selecting well-adapted or native plants. In most cases, native plants will be best adapted to the local climate, better able to withstand pests, require less maintenance and provide habitat for wildlife. Select plants that are able to withstand submergence for a few days during extended storm periods. See FS-09-28, LID in Northern Nevada: Plant Materials, for suggestions.
In addition to routine landscape maintenance, be sure to inspect bioretention areas regularly for accumulated sediment, damage and standing water. Check cells 48 hours after a rainstorm to ensure they have completely drained. Each month, inspect and repair eroded areas. Remulch bare areas as needed. If a bioretention area has failed, it can be excavated and rebuilt at the same site if infiltration rates are sufficient or underdrains are constructed.
Rain gardens
One of the most common bioretention designs for capturing runoff in a landscaped area is called a rain garden. The rain garden is depressed below adjacent impervious surfaces, such as concrete driveways or paved roadways. The water drains into the garden, where it gradually infiltrates into the soil bed. Pollutants are removed by a variety of processes, including adsorption, filtration, volatilization, ion exchange and decomposition.
Rain gardens are used nationwide as a technique for cleaning up stormwater. In northern Nevada, they are also useful in conserving water for landscape use, which may become even more important as water costs rise. In addition to filtering runoff pollution and conserving water, rain gardens have many benefits. They create habitat for birds and butterflies, enhance sidewalk appeal, add interest to the landscape and reduce highwater- use turf areas. In addition, where native soils drain well, they recharge groundwater.
Rain gardens are more than just depressions in the ground containing plants. They must be carefully designed to capture the appropriate volume of stormwater runoff, drain quickly, avoid erosion and blend with the landscape. The design should include a safe overflow area, such as a storm drain, ditch or open space area, in case stormwater exceeds the capacity of the rain garden.
After identifying an appropriate location to which runoff from roofs or pavement can be diverted, design the rain garden to capture and contain the water-quantity volume from the site - generally the first half-inch of runoff from the contributing drainage area. Typically, the soil surface should be depressed 6 to 12 inches to create space for water to temporarily pond. Excavate soil from the basin to make space for the soil mix, fill the hole with water, and observe how fast the water soaks in. Refer to FS-09-23, LID in Northern Nevada: Soil Considerations, for smallscale testing methods, or consult the Truckee Meadows Structural Controls Design Manual for approved methods. Rates should be greater than one-half inch per hour. If native soil infiltration rates are slower, place an underdrain surrounded by clean drain rock at the bottom of the basin to drain the system and prevent extended ponding. Connect the underdrain to a ditch or part of the storm drain system. Place a 4-inch layer of pea gravel in the bottom of the excavated basin to maintain drainage into the underlying native soils. Avoid using filter fabric in the bottom of the basin and around the underdrain, as it tends to clog with time, requiring complete excavation and replacement of the rain garden.
Next, construct a berm around the edge of the rain garden, using the soil that was excavated to make the depression. If the site slopes, the berm should be highest at the down-slope side. Do not attempt to construct a rain garden on steep slopes of 20 percent or greater.
The recommended soil replacement mix is 50 to 60 percent clean sand, 20 to 30 percent topsoil and 10 to 20 percent certified organic or pesticide-residue-free compost, thoroughly mixed and approximately 30 inches deep. If the existing soils are welldraining sands, loamy sands, sandy loams or loams, the percentage of sand and topsoil in the soil replacement mix can be reduced. Complete removal and replacement is often needed when existing soils are silts or clays. Leaf compost is a preferred type of amendment because the nutrient content in the leaves is typically minimal during the fall when leaves drop. This reduces leaching of nutrients out of the system. Do not use compost that includes animal or food wastes.
Plant the berm or use landscape fabric and mulch to stabilize the soil and reduce weed problems. Design an irrigation system for regular watering from May through October and between rainfall events. Drip systems are ideal for rain gardens. Select plants that will survive stresses such as periodic inundation or very dry periods, and avoid species that are invasive. Consider a mix of perennial flowering plants, shrubs and ornamental grasses, or consult LID in Northern Nevada: Plant Materials, FS-09-28.
Mulch the soil surface after installing plants. Mulching helps conserve water and decreases the potential for soil erosion from the garden. It also helps suppress weeds.
Maintenance is similar to that for any landscape bed. Monitor irrigation to make sure plants are not stressed. From May through October, monitor to ensure standing water does not persist for seven or more consecutive days to avoid mosquito breeding. Complete drainage within 48 hours is preferable. Replace mulch as needed to keep the soil surface covered. Inspect trees and shrubs for pests or diseases, and treat as needed or replace. Prune and weed when appropriate. Remove litter and debris on a regular basis.
“Rain gardens are more than just depressions in the ground containing plants. They must be carefully designed to capture the appropriate volume of stormwater runoff, drain quickly, avoid erosion and blend with the landscape. The design should include a safe overflow area, such as a storm drain, ditch or open space area, in case stormwater exceeds the capacity of the rain garden.”
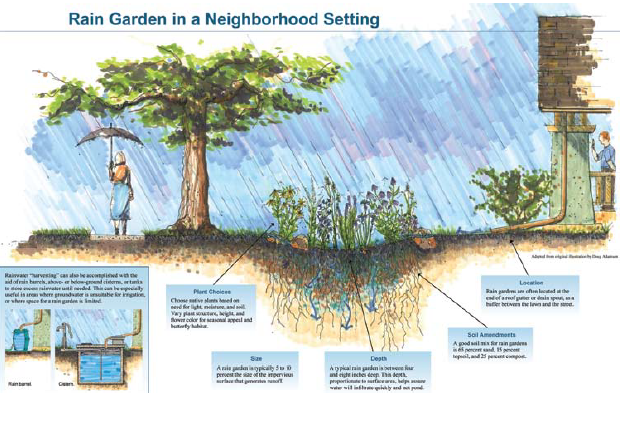
Image by USDA NRCS, 2007
Rain Garden Design Tips
- Don’t build a rain garden within 10 feet of building foundations.
- Keep rain gardens at least 100 feet away from septic system leachfields and water wells.
- Don’t make the depressed area in the rain garden so deep that a tripping hazard might occur. Most are 6 to 8 inches deep.
- Redirect rooftop runoff using underground piping, a vegetated swale or channel, or a gutter extender. Don’t let the runoff flow across bare soil, as erosion and clogging of the rain garden may occur due to excessive sediments in the runoff water.
- To avoid damaging tree roots, don’t excavate an extensive rain garden under large trees.
- Avoid rain gardens in areas where the seasonally high groundwater table is within 6 feet of the ground surface, to guard against potential groundwater contamination.
- Don’t build rain gardens in areas with slopes greater than 20 percent.
For a description of various Low Impact Development practices
consult the following Fact Sheets in the “Low Impact Development in Northern Nevada” series:
- LID: An Introduction, FS-09-22
- Soil Considerations, FS-09-23
- Rainwater Harvesting, FS-09-24
- Bioretention, FS-09-25
- Vegetated Swales and Buffers, FS-09-26
- Green Roofs, FS-09-27
- Plant Materials, FS-09-28
- Porous Pavement, FS-09-29
- Roadway and Parking Lot Design, FS-09-30
- Maintenance, FS-09-31
Tree box filters
In more urban or developed settings where space is limited, tree box filters can be used to add bioretention while providing landscape aesthetics. Filter boxes are mini-bioretention systems that provide landscaping benefits without requiring a high degree of maintenance. Tree box filters can be designed as flow-through planters with underdrains that do not allow infiltration into underlying soils, or they can be designed with drainage holes that allow infiltration.
As with all landscape features, tree box filters require routine maintenance. Check the curb cut inlet areas and the surface of the soil inside the box several times a year to make sure they are free of trash and debris, there is no standing water, and the filter box continues to function as designed.
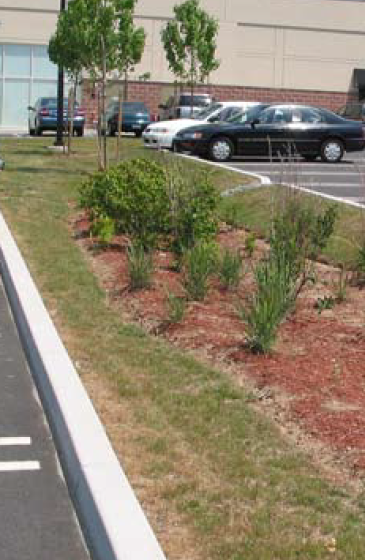
Image by National NEMO Network.
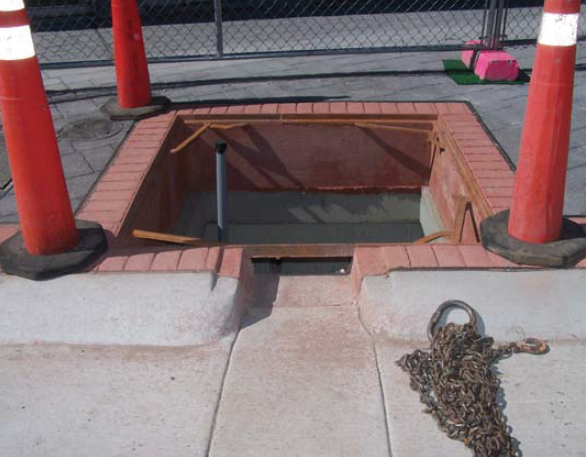
Tree filter box under construction on Virginia Street in Reno, Nevada., near the Truckee River. Runoff from the street enters the box through the curb cut. Image by Susan Donaldson.
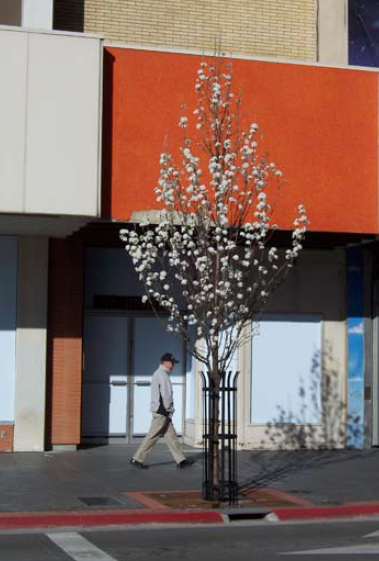
A completed tree filter box in downtown Reno. Image by Susan Donaldson.
Rain garden designs for parking lots. Image by National NEMO Network.
For additional detailed planning and design information
refer to the latest versions of the Truckee Meadows Low Impact Development Handbook and the Truckee Meadows Structural Controls Design Manual available at TMS.
Additional information about bioretention can be found at:
- Bioretention.com, An Online Reference for Designers, Bioretention
- Bioretention at North Carolina State University, BAE
- Low Impact Development (LID) Urban Design Tools, LID
- Prince George’s County, Maryland, Bioretention Manual, PGC
- Stormwater Manager’s Resource Center, SMRC
References:
- Atchison, D., K. Potter and L. Severson, 2006, Design Guidelines for Stormwater Bioretention Facilities, University of Wisconsin-Madison Water Resources Institute, Madison, WI.
- USDA-NRCS, 2007, Rain Gardens, Montana NRCS, 06/07/MT.
Published by:
Donaldson, S., 2009, Low Impact Development in Northern Nevada: Bioretention, Extension | University of Nevada, Reno, FS-09-25
An EEO/AA Institution. Copyright © 2026, University of Nevada Cooperative Extension.
A partnership of Nevada counties; University of Nevada, Reno; and the U.S. Department of Agriculture