Soil tests can help identify a number of key characteristics of a soil. Knowing these characteristics will help you determine suitable plant materials for your landscape, the right nutrients to add to your soil and the cultural practices you need to change to improve the productivity of your landscape and garden.
You should start by selecting a lab to test your soil. Contact your local Cooperative Extension office for a list of soil-testing labs in your area. The results from soil tests are only as good as the sample submitted. Call the lab for their specific recommendations on sample handling prior to actually collecting the sample. To ensure your soil test results are representative of your soil, collect your sample carefully.
Collecting the sample
Begin by looking at the soil in your yard or garden. There may be several types of soil present. If your property has two or more distinct types of soils, collect separate samples of each type of soil and submit them for separate analyses. Look for soils that are significantly different in color, texture (see Nevada Soils – Worth the Toil, University of Nevada Cooperative Extension Fact Sheet-09-14 for more information) or landscape position. Consider variables such as slope or poorly-drained bottom lands.
Soils may also be significantly different due to historic or current management practices. For example, lawns may receive different fertilizers and soil amendments than raised beds or orchard areas.
Because these areas have been managed differently, they will likely have different soil characteristics. If one part of your yard exhibits significantly different plant growth patterns, either excessive growth or stunted growth, sample this area separately from the rest of your landscape.
Once you have determined the areas to be sampled, randomly select five to 20 locations within an area with a single soil type. Avoid sampling near gravel, manure, compost piles, pet droppings or urine spots, septic leach fields, brush piles, burn sites, old building sites or under eaves. Avoid areas that have been fertilized recently, as soils from those areas will not give you a good assessment of your soil’s actual nutrient levels. Sample the soil in which you plan to plant. For example, if you are testing a raised bed garden area, sample the raised beds, not the walkways between the raised beds.

Select sites randomly throughout the area to be tested to give a representative sample.
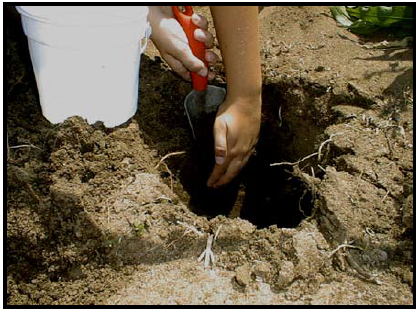
At each of the five to 20 sites, remove the surface debris and vegetation. Dig a hole 6 to 12 inches deep at each site, as shown in the picture above. Slide your shovel or trowel down the side of each hole from top to bottom, removing a “slice” of soil. Place all of the subsamples together in a clean plastic bucket and mix them thoroughly.
Be sure to use clean equipment to avoid contamination. A small amount of residual fertilizer can alter your sample and invalidate your soil test results. If you are testing for micronutrients, avoid using rusty, galvanized, brass or bronze sampling tools, as they may contaminate your samples with iron, copper, manganese or zinc.
Mix the subsamples in a clean plastic bucket, not a galvanized metal bucket, to avoid the potential for contamination. Next, remove pebbles and debris. Let the combined samples air-dry in the bucket or spread them out to dry in a protected area, free from potential contamination. Do not heat the sample to dry it. When the sample is dry, place about 2 to 3 cups of soil in a zip-top bag or lab provided container and label it with your name, your phone number, the location (garden, flower bed etc.) and the date. Keep the sample cool and out of the sun. Send the sample to the lab. Check with the lab for additional shipping requirements.

Once the hole has been dug, remove a slice using a trowel or shovel.
What should you test for?
Test for pH, electrical conductivity (EC), soil texture, organic matter content, and the three major macronutrients: nitrogen, phosphorus and potassium. Nitrogen is generally reported as nitrate, but it may also be reported as ammonia. Certain areas in the arid West have soils high in sodium. If sodium levels are high in your area, you should have your soil tested for sodium. Many labs offer a package that includes the above analyses plus the remaining three macronutrients (calcium, magnesium and sulfur) and various micronutrients (sodium, zinc, iron, copper, boron, manganese, chloride and/or molybdenum), total salts, and cation exchange capacity. Individual tests may be added to a standard test package, if desired.
Soil test results can provide landowners with important information about their soil, the results of their cultural practices and the nutrients needed to make their soil more productive. Soil test results are only as good as the sample submitted to the lab, so collect a contaminant-free, representative sample for submission to a certified lab.
References
- Donaldson, S., et al, 2008, Living on the Land: Stewardship for Small Acreages, Module 2: Your Living Soil, University of Nevada Cooperative Extension CM-08- 07.
- Osmond, D.L., C.R. Crozier and D.H. Hardy, 1997, Careful Soil Sampling – The Key to Reliable Soil Test Information, North Carolina Cooperative Extension Service, AG-439- 30.
- Robotham, M. and J. Hart, 2002, Soil Sampling for Home Gardens and Small Acreages, Oregon State University Extension Service, EC 628. OSU
- Whiting, D., A. Card and C. Wilson, 2006, Soil Tests, Colorado Master Gardener GardenNotes #221, Colorado State University Extension.
Hefner, M., Donaldson, S., and Skelly, J.
2009,
How to Take a Soil Sample,
Extension, University of Nevada, Reno, FS-09-13


